Wednesday, January 30, 2008

Mangosteen Tasting!

A small delivery of mangosteens appeared at the culinary school on Monday! I'm not sure how or where they came from, but a few of the chef instructors had them, and my Monday night instructor was generous enough to share his with us.

None of us really knew much about the mangosteen other than, 'Hey, isn't this that really crazy fruit that was banned in the US until last year and costs so much money that it hardly matters that we can import it now?' We definitely weren't sure how to cut it open or what to expect once we did. So dutiful culinary explorers that we are, we huddled around a cutting board
shoulder to shoulder, made preliminary gestures with paring knives and fillet knives and chef knives, until we finally got tired of being delicate and THWAP! The mangosteen was breached.

My pictures didn't turn out very well, so I only have this one. If you want to see how a mangosteen should be properly dissected, take a look over HERE. There aren't instructions, but I'm thinking that you use a paring knife to cut around the equator of the fruit about a half inch deep and then pull the cap off. That husk is pretty tough, so it must be tricky to use enough force to cut through it without damaging the fruit within.

I also found surprisingly little information on mangosteens during my quick 10 minute search just now, aside from that it was illegal to import it into the US until recently, it's crazy expensive, and it purportedly has some nifty healthy benefits...if you can manage to acquire enough of them in one place (and don't have to share) and then continue having access to them for a long period of time.

The outer skin and husk is inedible (though some of my research says that can be used as a nice fabric dye!). You eat that white flesh in the center--scoop it out with a spoon and eat it just like that. Once removed from the husk, the flesh looks like a milky mandarin orange and--also like a mandarin--there's a little seed in each quarter that you have to spit back out. (I really like the posh delicacy vs. pedestrian vulgarity of this fruit!) The texture in the mouth is a cross between the juicy burst of an orange and the melty flesh of a strawberry. And completely contrary to this, the taste was like a cross between coconut and banana--to me anyways.

Have any of you had the chance to try a mangosteen? What do you think--is it worth the hype?!

Sunday, January 27, 2008

Mini-Calzones

I had some leftover brisket wallowing in my fridge on last week and got it in my head to make some mini-calzones over the weekend. I thought I'd add some caramelized onions and roasted red peppers, but got stumped on the cheese. I stood in front of the cheese fridge at Trader Joe's for at least fifteen minutes picking up one cheese and then another, squinting my eyes and tasting various imaginary flavor combinations in my mouth. Goat cheese? No.... Sharp cheddar? Possibly... Maybe with some BBQ sauce? Sigh.... And then my hand wavered over some smoked gouda. I can't remember the last time I had gouda. No reason, really, I just...haven't.

And standing there imaging how gouda would taste with my smoky brisket etc. etc., I remembered my dad coming home from work with a shopping bag, all excited and jittery as he pulled out a round of smoked gouda and some tart apples. I was probably fourteen or fifteen at the time, and I just remember how happy he was as he cut up the wedges of apples and arranged them around some slices of gouda. "Here," he said, pushing the plate toward me, "Try this!" And with a fair bit of curious trepidation (likely disguised as teenage sass), I mirrored him as he took a slice of apple and layered on a slice of gouda. I bit off a corner and oh my! Good stuff!

I think this was the first time that I realized that cheese could be something other than what was sprinkled over pasta. It could be something more. It could transform my quiet, reserved father into a euphoric, cheese-pushing gourmand. That's some powerful stuff, right there.

And that's how I ended up with smoked gouda in my calzones. Not precisely a 'traditional' filling for calzones, true, but then I've never exactly been one to stand on formalities. I think my calzones and I will be juuuust fine.

I started making these mini-calzones a while back as part of my open-ended quest to find healthy, better-tasting, freezable, and easily-transportable lunch alternatives instead of things like Hot Pockets, Cup-o-Noodles, Lean Cuisines, and their ilk. It took a while to find a crust that fit the 'healthy' profile, until it dawned on me
(like a skillet to the forehead) to use my thin-crust pizza recipe. Duh. That dough is perfect for this--thin, but chewy; easy to make and healthy to boot; just enough flavor to give you a nice bread-y background but not so much that it steals the show. Splitting the dough into eight portions seems to give just the right amount of dough for a six-inch calzone. Poi-fect.

The combinations for fillings are really endless. I usually do a medley of meat, cheese, and sauteed veggies--whatever I have on hand.
Keep in mind that they are mini-calzones, after all, so there's a limit to what you can stuff in them. I usually weigh out a half-ounce of meat, a half-ounce of cheese, and then layer on as many veggies as I think will fit. Some combos I've done in the past are spicy pulled pork/goat cheese/caramelized onions and red peppers, sausage/cheddar/veggies, eggplant/kalamata olives/feta. You can also throw in a sauce of your choice--BBQ sauce works really well and a dab of tomato sauce is never out of place. Obviously, these calzones can be entirely vegetarian--even vegan, since the crust doesn't have any dairy! Woot!

The only drawback is that these are pretty labor-intensive to make, so I usually set aside an afternoon, make a double-batch of dough and keep on trucking until my fillings run out. I have found that it helps to lay out little piles of fillings in a row so you can just scoop and fold, scoop and fold.

Once they're cool, I wrap them up in saran wrap and throw them in a zip-lock bag in the freezer. A few minutes in the microwave gets the cheese melty and all the insides piping hot.

~~~
Mini-Calzones
(makes 8 with one batch of dough)

1 batch of thin-crust pizza dough (Recipe HERE)
4 ounces of cooked meat, separated into 8 half-ounce piles
4 ounces of cheese, separated into 8 half-ounce piles
sauteed veggies of your choice (onions, green or red peppers, eggplant, zucchini, mushrooms, etc.)

Pre-heat oven to 475-degrees F.

If you haven't already done so, cook your meat and set it aside to cool. Then sautee your veggies in a little olive oil until they are mostly cooked through and set them aside to cool. It's important to cook these ahead of time because they won't cook all the way through in the oven. Also, if you add the veggies raw, they will likely release a lot of liquid in the oven and you'll get mushy calzones.

Find a bowl in your kitchen that is about 6 inches across (in diameter). Use this bowl as a guide to trace 8 circles onto parchment paper. Cut the parchment into 8 pieces with once circle on each piece of parchment. Flip the parchment upside down so the actual pencil/pen mark of the circle is against the counter and your food-surface is clean.

Cut the pizza dough into 8 equal pieces. Place one piece on a piece of parchment paper in the middle of the circle. Press down on the center of the dough and then use the heel of your hand to gently push outward on all sides until you've filled the circle. The dough will be about 1/8 i
nch thick. Repeat with the remaining pieces of dough and parchment.
Cover each rolled-out circle as you finished with saran wrap or an upside down bowl to keep it from drying out while you finish the rest of the circles.

Place the meat and cheese in the center of the dough and layer on as many veggies as you think will fit (you'll get a feel for it after making one or two). Leave about 3/4 - 1 inch of space around the edge.
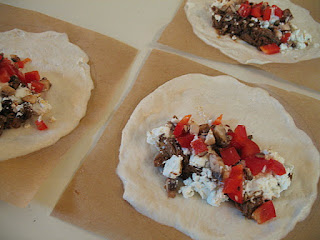
Lift one side of the dough over onto itself and pinch the dough together in the middle. Pinch all the dough to one side closed and then go back and pinch the other side closed, forming a half-moon. I find it easiest to do this if I pick up the calzone and hold it upright in my left hand like a taco, and then I use the fingers of my right hand to pinch the rest of the dough closed. You can poke any errant bits of filling back inside. Repeat with remaining calzones. (Note--the parchment paper will continue sticking to the dough and that's fine! When the calzone bakes, the parchment will gradually un-stick itself.)
Arrange as many calzones as will fit on a sheet pan. Just before baking, use a paring knife to cut three steam vents in the top of the calzone--go right through the parchment paper. Bake the calzones for five minutes and then flip them over. Bake for another 5 minutes and flip them over again. Bake for another 3-5 minutes until the calzones are golden and browned in spots. This whole baking process takes about 15 minutes in my oven, but it may take shorter or longer in yours. Since the filling is already cooked, you're really just looking for the crust to be a nice browned color. If the edges start to char, that's a sign that they're likely done cooking.

Remove calzones to a cooling rack and bake off any remaining calzones. Once they're completely cool, wrap each calzone in plastic wrap and keep them in a ziplock bag in the freezer. They'll last in there for a few months (if you don't manage to eat them all first...)

I don't get too worried about the calzones splitting open, honestly. These are more functional than beautiful and I'm usually the only customer I have to please! Once they're cool, I tuck any tumbling bits of filling back into the shell and wrap it all up in saran wrap so it's a tidy package for grabbing in the morning and sticking in my lunch bag.

Re-heat for 1-3 minutes on High. I've also eaten them cold (like cold pizza) if they've been thawing in the office fridge for a few hours.

For interested parties and Weight-Watchers folks: The calzone shell alone is 2 points. A half-ounce (14 g) of meat is usually 1-2 points, and a half-ounce (14 g) of cheese is also usually 1-2 points. If I only use a dab of olive oil for the veggies, I usually count them as zero points. So! One calzone is usually 4-6 points or so. Not too shabby for a meal-on-the-go!


Friday, January 18, 2008

Photo of the Week: Behold! More Pasta!

Shaking excess flour from cut pasta.

I know! Pasta! It's really just so cool! And I know you're all out there going, "Yes, Emma! I'm with you! Pasta is really just so cool!" Excellent. I knew I liked you.

This here's some spinach pasta--same basic pasta recipe with a pound of steamed spinach cuz it's pretty. And also because it's "good for growing girls and boys." We rolled it out fairly thick (Level 5 on most pasta machines), so it had a nice chew to it. And it slurped up nicely with a Gorgonzola Cream Sauce.

Tagliatelle Verdi Al Gorgonzola
(c) Roberta L. Dowling 2004, CSCA

Pasta Dough
1 lb fresh spinach, de-stemmed, steamed, squeezed dry, and chopped (I'd imagine you could also use frozen grocery store spinach here if you wanted to save your self some steaming)
3 eggs
4 cups of flour

Stir the eggs together with a fork and then stir in the spinach. Make a well in the flour and pour in the egg/spinach mixture. Gradually incorporate the flour into the egg/spinach with a fork until it comes together in a cohesive ball. (Note: You'll probably end up using more flour with this pasta because of the spinach.) Knead until smooth and let rest for a half hour. Roll out and cut into thick noodles.

Sauce
4 oz. butter
1 c. heavy cream
1 lb gorgonzola, rind removed and cut/broken into small chunks.
3/4 c. Grana Padano cheese, grated
1 pinch nutmeg
salt and pepper
chopped parsley for garnish

Melt the butter and add the cream until it simmers. Cook for a few minutes on low heat. Add the Gorgonzola and half of the Grana Padano cheese tot eh cream sauce and stir gently over low heat until thoroughly melted. Add the nutmeg and season with salt and pepper. Cook the pasta in large amount of salted, rapidly boiling water. Drain the pasta and toss with the Gorgonzola sauce. Serve with an extra sprinkle of Grana Padana and some chopped parsley.

Sunday, January 13, 2008

All done.

Well. This is it. The end of an era. This Friday was my last day at the Noodle Factory. I'm off to try my hand at making actual, edible noodles instead of intellectual ones! That's right--it's time to see how this whole 'cooking thing' works out.

This change has been in the works for quite a while, but I haven't wanted to talk about it much until it was real. I'm actually not sure what to say now that it's actually here and happening. I think I keep waiting for...Something To Happen. The sky to fall. Or a million gongs to start gonging in celebration. Or someone to appear on my doorstep and hand me an official announcement that "The Deed is Done."

But instead, I wake up and find that I am still me. And that this change is really just the newest incarnation of a series of changes that have been playing out over the past year. Or several years, if you really want to get big picture on me. I think back to that Joseph Campbell quote that was so powerful to me a little over a year ago right as all of this changing was beginning to happen: "The adventure that [the hero] is ready for is the one that he gets."

A lot of people have been telling me how brave I am to be leaving my job and this career. Hearing myself described as 'brave' caught me off guard, though now that I've had time to think about it I think I understand what they meant. Leaving a stable job, a defined career path, a community of incredible colleagues, a place where your role in things is known and understood--it does take a certain kind of courage to do this, but it's a courage born from the feeling that this is just what needs to happen now.
I don't really feel brave. I do feel ready. I feel like this adventure and I have been traveling together for a long time without knowing it, shaping each other and getting a feel for what's ahead.

Right now, what's ahead is an internship at Cook's Illustrated/America's Test Kitchen. It starts in another week, and I'll be working in their test kitchen doing prep work, helping the test kitchen cooks with their recipe testing, doing background research on recipes and articles, and answering calls of "Hey! You! Intern!"

So. This is it. Ok, Mister Campbell, I'm following my bliss. Fingers crossed.
P.S. This lovely picture is me hard at work at the Noodle Factory last summer dressed in my Launch Specialist Uniform. That's right: Emma C, launching manuscripts to production since 2005! ("launching" = "move 'er down the conveyor belt"--a fav bit of Noodle Factory Lexicon)

Saturday, January 05, 2008

Cous Cous Salad with Winter Squash and Cranberries


We're in the home stretch of winter with daylight hours increasing bit by bit, but with farmer's markets and fresh produce still many months away. This cous cous salad made with winter squash and a handful of pantry staples is a bright and tangy hint of springtime, and yet it's hearty enough to fuel us through another day of slush and wind. This salad can be served room temperature or cold.

Cous Cous Salad with Winter Squash and Cranberries


1 medium butternut squash (or other hard winter squash)--peeled and cut into 1-inch chunks

3/4 cup un-cooked cous cous

1 cup water

1 onion-diced

4-5 Tablespoons white wine vinegar

2 Tablespoons olive oil

Zest of one orange

1/2 teaspoon coriander

1 teaspoon cinnamon

1/2 teaspoon nutmeg

1 teaspoon cumin

1-3 teaspoons salt--to taste

1 can garbanzo beans--drained

1/2 cup dried cranberries

2 oz goat cheese (if desired)

1/2 cup walnuts-coarsely chopped (if desired)


Pre-heat oven to 400-degrees. Toss squash with a bit of olive oil and spread on a baking sheet. Roast squash, stirring occasionally, until tender--about 30 minutes. Allow to cool before combining with other ingredients.


Heat water in sauce pan to boiling. Add cous cous and stir. Remove pan from heat, cover with a lid, and let sit for about 15 minutes, until the cous cous has absorbed all the water. Fluff with a fork and set aside.

Saute onion in a skillet over medium-high heat until translucent. Set aside and allow to cool.

In a small bowl, whisk together vinegar, olive oil, zest, spices, and 1 teaspoon of salt.


In a large bowl, combine squash, cous cous, onions, garbanzo beans, and cranberries. Pour on the vinegar-oil dressing and stir to combine. Taste to check seasoning and add salt if needed.
If including, crumble the goat cheese into chunks and gently fold into the salad. (Note: Make sure the salad is room temperature at this point, or the goat cheese will melt.)

Top each serving with a sprinkle of walnuts and enjoy.


Makes about 5 cups.

Tuesday, January 01, 2008

Photo of the Week: Making Gnocci

I am finding that I love love love making pasta. Perhaps this is unsurprising given my fondness for all things carbohydrate, but still. Pasta! By hand! How cool is that?! And it's surprisingly simple, if labor intensive. The pasta dough itself comes together pretty quickly. Combine ingredients. Knead knead knead until smooth and uniform and, if you cut into it with a knife, you don't see any air pockets.

And then comes the Shaping of the Pasta--your tortellini, your ravioli, your gnocci. Yes, it's a jolly time...for the first ten minutes or so. You think to yourself, "Oh! Look at that little ball of dough! How much pasta can that cute little ball actually make? This will be a snap." But really there's a whole car-
full of clowns in that ball, tell me you.

It's best to get a group of willing and/or unsuspecting volunteers to help you out. With everyone jabbering away, only half focused on the dough in their fingers, it's easy to imagine that you're actually in the Italian country side, the scent of basil drifting through an open window, perhaps a bottle of wine or three brought up from the cellar just for tonight. Words like "soothing" and "community" and "let's move to Italy" drift through your mind.

Still. There's a lot of pasta to be made. I guarantee there will be a moment when you all fall silent and find yourself hypnotized by the motion of your hands, reaching for the next nub of dough, smooshing it into shape, tossing it onto the floured sheet pan without looking to see where it lands. To hell with uniformity, NEXT NUB! Let's go people, NEXT NUB!
But push on, I say! There's good pasta ahead!

Take gnocci, for example. I love the chew of gnocci between your teeth. I love spooning out just one and letting it roll on my tongue for a second before I bite into it. Yes. That's bliss.
Gnocci Di Patate Alla Piemontese
courtesy of CSCA, copyright Roberta L Dowling 2004 (with modifications by EmmaC)

2 lb. 4 oz potatoes (Maine or All-Purpose)--scrubbed, skins left on
Salt and white pepper to taste
1 egg, beaten
7 oz. flour (approximately--you will likely not use this much unless you live in a rain forest, but have there if you need it)

Cover the potatoes with cold water, bring to a boil, and cook until they are soft and can be mashed. Drain and peel them as soon as you can handle them (it's easier to peel them while they're hot). Puree them through a food mill or ricer, or mash them very very very well. Add the salt and pepper and egg. Mix well. Add a little of the flour at a time, gathering the dough into a ball and--when able--kneading until the mixture is soft, smooth, and no longer sticks to your hands. Add additional flour as necessary.

Lob off a chunk of the pasta (somewhere between a golf ball and a tennis ball size) and roll it into a thick pencil-like stick the size of a cigar. Cut into 3/4-inch pieces. Hold a fork (tines down) in your left hand (this is for right-handers; switch if you're a leftie). Place a nub of dough on the back of the tines and press down on the lower half of the nub with your thumb. Using the palm of your hand, Roll the thick, top part of the nub over the flattened part, and roll it off the fork. (See the topmost picture above) You should have a little pill-bug shaped piece of dough (yum!).

Keep the gnocci on a floured sheet pan and (when you're finished shaping aaaaall of them) freeze them until you're ready to cook.

Bring a very large amount of salted water to boil. The more water the better, as a) it will come back to a boil more quickly after you add the pasta and b) it will help the starch disperse so your pasta is chewy without being gummy. The salt just flavors the pasta.

Cook the gnocci in the water for a few minutes until they float to the surface. Remove with a slotted spoon and drain.

Serve with any sauce or simply with some Parmigiano Reggiano cheese and melted butter. Mmmm...butter.

Oh, look! It's 2008!

It started snowing halfway through my run (the best run of 2008!) and by the time I got home, my glasses were so fogged and flecked with water that I couldn't see how gorgeous it was. Look! Gorgeous! The most gorgeous snowstorm of 2008!

I had the Engineer and some friends over last night and made them eat food until we were so full that we couldn't even be bothered to go to any of the First Night events downtown and stayed home to watch Ratatouille instead. I think it was right around that point in the movie when all-is-lost-but-surely-will-turn-out-ok that my friend Troy looked down at his watch and said, "Oh. Happy 2008, guys!" We scrambled to open a bottle of champagne, toasted each other, and watched the end of the movie. And then I fell asleep and had the best night's sleep of 2008.

Happy 2008, guys!

I only have one real resolution this year, and that is, simply, to relax. It's more of a theme, really. Or a mantra. I'd just like to be able to get my shoulders down from around my ears. Maybe just remember that there's this thing? Called a 'big picture'? Or something? For me, relaxing means letting go of the little things--like not being hard on myself if I don't go running. When it's about to snow. And I'm getting over a cold. And the Engineer is being cozy on the couch. (P.S. It just took me about five minutes to write that line because I couldn't think of good examples and then I couldn't figure out how to write it and hit that perfect funny-yet-serious note. This is what I'm talking about, people!)

Relaxing for me also means--this is really new and big and scary for me--asking for help when I need it. It means admitting that sometimes I need a little help and that's ok. It's so automatic for me to just take care of everything and git 'er done and push through, that I don't even realize that there are folks around that might be willing to...oh...pick up dinner. Or drive me to the store. Or hold my hand when I'm feeling scared about jumping off of all these cliffs.

There's a lot of big changes coming in the next year--and especially the next few months--and I have a feeling that I'm going to need to remind myself to relax quite frequently. Relax, unfog my glasses, and take a look around.

Here are a few personal goals I have for the new year to look forward to:

Knitting:
*Finish the Engineer's sweater (Because it is finally, truly, thankfully time)
*Finish Angelina's Scarf (Yes, Virginia, there is a Santa Claus, and yes, Angelina, there is a scarf! And it's almost done!)
*Knitting something for myself that is all mine. Something big. And cozy. And maybe sweater shaped.

Cooking:
*Roast a chicken (Can you believe that I have never roasted a chicken?!)
*Learn how to can
*Learn how to make infused liquors

Reading n' Writing:
*Finish Omnivore's Dilemma by Michael Pollan
*Start my Great American (Young Adult) Novel

Tuesday, December 18, 2007

It's a Bread Eat Bread World

If you've ever wondered what happens if you forget to slash the top of your bread, this is it. Hard to tell if the loaf is eating itself or giving birth to a Brave New Loaf. Either way, it ain't pretty.

But golly GEE, it tastes good! This is the second loaf from the Simple Crispy Bread recipe I made last Thursday, baked after lazing about (I mean, fermenting) in the fridge for three days. The taste was much the same (yeasty and salty--in a good way), but the crumb and texture were very different. In the first loaf, the crumb was pretty tight with a lot of small, evenly distributed holes. In the second loaf, the crumb was looser with some bigger holes here and there, much more like a traditional hearth loaf. The texture was also very chewy and airy--a seeming contradiction in terms, but actually so delicious and adept at holding pockets of melted butter that we ate the entire loaf before I thought to take a picture to show you one of the slices. Oops!

Sunday, December 16, 2007

Simple Crispy (No-Knead!) Loaf

This past Thursday, I left my cube to get something at the printer and by the time I walked back (muttering to myself because I'd ALREADY found a typo I'd have to fix), the sky out the window was full of thick, fat flakes. Our offices closed about an hour after that. I was supposed to have class later, but honestly? I just wasn't feelin' it. What I WAS feelin' was going home, curling up on the couch with some knitting and watching the season premiere of "Crowned" taped the night before. And so I sat at my computer in my empty office pressing the refresh button on my internet browser until ("C'mon! C'mon!") the note went up on the school website that classes were canceled. YES!

Three full trains passed through the station before one came with enough space for me to smoosh myself, my two bags of shtuff, and my equipment roll into the crevice between the first step and the door. Two hours later, I finally got off the train and forged the last stretch of the journey on foot because I could walk faster than the traffic. It was cumbersome with the bags, but I actually think they made good ballast to keep me afloat in the snow. And though I managed to keep my footing the whole way, I like to think they would have cushioned my fall. Except for my equipment roll. That would have...yeah, not the equipment roll.

So after I thawed out with a glass of wine and some mother-daughter pageant action, what did I do with my evening off from baking class? Why, I BAKED of course! I mean DUH! What ELSE would I be doing with a night off from school?!

Ahem.

I first saw this recipe for "Simple Crusty Bread" in the New York Times a few weeks ago. It pledged to be an alternative to the No-Knead Bread of recent fame, but even simpler! quicker! and more flavorful! It was this last promise that really caught my eye since, for me, the lackluster flavor of the No-Knead Bread outweighed it's convenience. I was also intrigued by the fact that one recipe made four loaves and the dough would keep in the fridge for up to two weeks, allowing you to lob off a piece whenever the mood struck. In general a slow rise will give you a more complex flavor and better texture, and a 'retarded' or 'delayed fermentation' rise in the fridge will result in a slightly sweet bread, like the slackdough breads I was working on a few summers ago--HERE. I baked off one loaf right away and stored the other three in the fridge for taste-tests over the next few weeks.

Dough just after combining ingredients

My initial reaction to this bread is....(drumroll!)....pleasant surprise. The just-mixed dough was stiff and tacky, and I had very low expectations of being able to shape it into anything resembling loaf. But somewhere over the next two hours of rising, it really pulled itself together. With only a light dusting of flour, I was able to handle it relatively easily and shape it into a nice little ball. I decided to rest my dough on the countertop instead of on the peel as the recipe suggests since I've had a few too many experiences of resting the dough on the peel, going to shuffle it loving into the oven, and having it stick to the peel and turn out looking like THIS despite a generous dusting of cornmeal. I was able to pick the ball up off the counter and plop it onto my peel without too much fuss. It stuck a bit, but then willingly slid out onto the pizza stone. It didn't rise very much in the oven, but it did keep it's nice round shape without deflating at all--an amazing feat for any loaf, if I do say so myself.

The dough after the 2-hour rise

The crust browned very evenly and crackled when I cut into it--thumbs up for that. The crumb was tight and moist with a few larger holes here and there--a second thumbs up. And the taste? Decent! Not as much flavor as a traditionally kneaded bread, but also not too shabby. It's a little salty, but I'm a fan of salt so no complaints here. It even past the second-day-toast-test with flying colors. I also like that it's a smaller loaf, which means that I have a chance of eating it before it goes completely stale or moldy.

I'm really excited to try the other loaves as the dough ages over the next few weeks. Even if there's not much flavor development, I think this is still my new standby Lazy Girl's Loaf!


Shaped loaf

This is what the underside of the loaf looks like after you stretch the top

~~~~~~

Lazy Girl's Loaf (a.k.a. Simple Crusty Bread)
Recipe alone: http://www.nytimes.com/2007/11/21/dining/211brex.html
Full article: http://query.nytimes.com/gst/fullpage.html?res=9C0DEEDB153FF932A15752C1A9619C8B63

Adapted from "Artisan Bread in Five Minutes a Day," by Jeff Hertzberg
and Zoë François (Thomas Dunne Books, 2007)

Time: About 45 minutes plus about 3 hours' resting and rising

1 1/2 tablespoons yeast
1 1/2 tablespoons kosher salt (If you don't like salty, try cutting this down to 1 Tablespoon)
6 1/2 cups unbleached, all-purpose flour, more for dusting dough
Cornmeal.

1. In a large bowl or plastic container, mix yeast and salt into 3
cups lukewarm water (about 100 degrees). Stir in flour, mixing until
there are no dry patches. Dough will be quite loose. Cover, but not
with an airtight lid. Let dough rise at room temperature 2 hours (or
up to 5 hours).

2. Bake at this point or refrigerate, covered, for as long as two
weeks. When ready to bake, sprinkle a little flour on dough and cut
off a grapefruit-size piece with serrated knife. Turn dough in hands
to lightly stretch surface, creating a rounded top and a lumpy bottom.
Put dough on pizza peel sprinkled with cornmeal; let rest 40 minutes.
Repeat with remaining dough or refrigerate it.

3. Place broiler pan on bottom of oven. Place baking stone on middle
rack and turn oven to 450 degrees; heat stone at that temperature for
20 minutes.

4. Dust dough with flour, slash top with serrated or very sharp knife
three times. Slide onto stone. Pour one cup hot water into broiler pan
and shut oven quickly to trap steam. Bake until well browned, about 30
minutes. Cool completely.

Yield: 4 loaves.

Variation: If not using stone, stretch rounded dough into oval and
place in a greased, nonstick loaf pan. Let rest 40 minutes if fresh,
an extra hour if refrigerated. Heat oven to 450 degrees for 5 minutes.
Place pan on middle rack.

Thursday, December 13, 2007

Photo of the Week: Chocolate Cake...Thing-A-Ma-Jigs

I haven't thought of a good name for these puppies yet. Can't quite figure out a name grand enough, nuanced enough to appropriately describe these layers of chocolate genoise, pomegranate whipped cream, and hazelnut dacquoise. Oh, man, they were tasty!

Hazelnut dacquoise, for those who don't know, is a basic meringue (egg whites beaten with sugar) with ground hazelnuts mixed in. I spread them into little rounds to form the flat 'cookies' sandwiched between the whipped cream. I had...oh...two trays or so of cookies left over and may have (MAY have) personally eaten the majority of them.

Any brilliant names come to mind?!

Wednesday, December 12, 2007

Home-made Holiday Gift-o-Rama

Updated 12/12/07

Hi, folks!


The Engineer and I have declared this to be the Christmas of No Stress, and to this end we have forsworn the following:

1) The Finding of the Perfect Present
2) The Spending of the More Money Than Makes Us Comfortable ("Cringe-making" is our barometer for this)
3) The Buying of a Present for Everyone and Their Little Dog Too
(and a personal one for yours truly)
4) The Spending of Too Much Time (a.k.a. FOREVER) Crafting Presents

To follow through with this commitment, I have decided that I'm going to make the majority of my presents myself, be it with crafts or edibles, and I'm going to give everyone essentially the same thing.

In this era of DIY and craftiness, you'd think it would be easy to find simple-yet-awesome, budget-friendly craft projects, but I've actually been finding it rather difficult. A lot of projects can end up being rather spendy once you add up all the various bits and pieces (some people's definition of 'budget-friendly' being different from my own) Or they take forever to assemble. Or they aren't mass-production-friendly. But it can be done! [Finger jabbed triumphantly skyward]

So, for your holiday crafting enjoyment and entertainment, below is a smattering of projects I've found that appear to be Cool, Cheap, and Stress-Free. Click on the name of the project to link to the original website. Some of them don't have instructions, but seem logical to assemble. If you have questions, feel free to comment or e-mail and I'll cypher it out with you:

*I'll keep adding to this list as I find new things over the next few weeks. Check back in!

Crafts:

Felt wine racks (or HERE)
Rice face masks
Bacon Magnets made with felt
Neck-Warmer--a sexy and simple one-skein knitting project

Eats:

Caramels
-->Salted, dipped in chocolate, w/ espresso powder, bourbon, rum...
(P.S. I'm actually trying another recipe this weekend that I got from one of my chefs at school and that looks easier than this one. If it works out, I'll post about it next week.)
Marshmallows
Coffee Liqueur
Crunchy Snacks

Mixes:
*I'm packaging my mixes in Bell canning jars, which I found at a local hardware store for $8 for 12 jars. You can certainly go shmancier--the Container Store has a plethora of interesting vessels.

Cocoa
Beer Bread (or HERE)

Enjoy!

Sunday, December 02, 2007

Photo of the Week: Paupiette of Sole with Parmesan Souffles

These bite-sized souffles have been one of my favorite things that I've made so far in culinary school. The base is a thin fillet of sole coiled into a ring and tied with a thin strip of blanched scallion. Around this, we wrapped a "collar" of aluminum foil and spooned the Parmesan souffle on top of the sole. (The collar is used to support the souffle as it rises and is removed right before serving.)

These little guys are fantastically light. The texture of the flaky sole and the creamy souffle play off each other nicely, and the hint of Parmesan brings out the flavor of the sole. In my humble opinion, of course.

Thursday, November 22, 2007

Wait for it...wait for it...

To folks coming over from Mason-Dixon Knitting--Welcome! Thanks for stopping by! To catch up on the back story on this sassy project, go HERE and HERE and HERE.

Please join me in a moment of silence. The daisy dukes...oh, the DUKES!...they're actually done. It's been a long and season-spanning journey. There were highs and lows, debates over pockets and waistbands, fears of binding off too soon and lily-white thighs. Progress was slow but inevitable and the siren call of knitted glory pushed me ever onward. My friends near and far, I give unto you The Daisy Dukes:

In the beginning, I kept careful notes on construction and method, diligently recorded stitch counts, and photographed the stages. In the end, though, I just started winging it. Willy nilly! Freestyle! Booty or bust! For interested knitting parties out there, the design was based on the Sweetheart Short, a free pattern over at Knitpicks.com, though I used their pattern more for method and construction than actual stitch counts. I did a swatch and worked out my gauge, sizing the dukes to fit yours truly. When I figured out how many stitches I needed to fit around my waist, I divided them in two and worked the front (with pockets) and back separately.

The pockets, oh, the pockets. Without a doubt, these pockets are my single proudest achievement as a knitter, mostly because it involved channeling my inner-nerd and figuring out slope. I debated whether to knit the pockets by hand or cut them out of an o
ld pair of jeans. I really really wanted that look of the pockets hanging out below the hemline, but the idea of knitting all that in sock yarn was a bit...daunting. In the end, I decided that cut-outs from real jeans would add a little je ne sais quoi touch of authenticity and also to reduce bulkiness in the final short. Plus I was already about on pace with the Big Dig in terms of project completion, so it was time to cut a few corners. Just like the Big Dig (oh! OUCH! BURN!).

I traced the contour of the pocket onto graph paper and compared it to my gauge-swatch to figure out number of stitches and where to increase. At this point, I realized that these dukes will be tough to duplicate because there's not a standard pocket size on jeans (or shape, for that matter). To any potential Daisy Dukers out there: It's totally worth
it to figure out how to shape those pockets. The rush when you finally get it is unbelievable. My personal Moment of Enlightenment occurred in the Logan International Airport in Boston. I believe I might have stood up with tears in my eyes and pumped my fist in the air a few times. I might have also tried to get my fellow travelers to high-five me, but since I was babbling about "Slope! And see! The pockets! The gauge! See! I used graph paper!" they kind of edged away quietly with excuses of connecting flights. Worth. It.There are some good shots of the pockets-in-progress in an earlier post HERE.

After the pocket shaping was done and I connected the front and the back, the rest of the body was worked in the round. When I got to the legs, I divided the stitches again and worked each leg separately. I did work in a few Raspy-esque rips and tears, but they didn't end up being big enough to be very noticeable. For those interested, I worked the 'rips' by increasing one and then dropping that increased stitch when I was binding off along the hem. The dropped stitch unravels and leaves a nice little rip. I considered bleaching the rips to make them more visible, but in the end I really liked the clean look of the hem.

For the waist band, I picked up stitches along the edge and increased stitches over the space where the pockets would go. I did about an inch and half of ribbing and bound off.

And last but not least, I stitched in those Pockets of Glory using a basic back stitch. All of the detailing--the faux fly and the faux back pockets--were also done in back stitch similar to the Blu pattern over on Knitty.

I feel a profound sense of satisfaction at having finished these--and finished them in time to wear at my Halloween party, none the less! I'm not sure how many occasions I will have in the future to sport these ladies, but you know? It just makes me happy to know that they exist.

Notes for Daisy Dukes: Take 2 (a.k.a Daisy Dukes: Oops I Did It Again) and/or the intrepid knitter:

*Worth it to figure out the gauge.

*Start the raspy rips and tears further up the legs
*Knit just a few more rows on the legs. I knit about an inch and I think I could have gone an inch and a half and still had the bottoms of the pockets showing. Yes, they are Daisy Dukes, but...let's just say there was a bit more of my badonkadonk showing that was strictly necessary.

Wednesday, November 14, 2007

Photo of the Week: Phyllo Napoleons

Chef Louise's first instruction for phyllo pastry: "Open the box."

"Maybe there are folks out there who LOVE to make phyllo pastry, she said, but not me." And so, dutiful students that we are, we all opened our boxes.

These napoleons were a lot of fun to make. I used 8 sheets of phyllo pastry and layered them with melted butter (clarified butter, or else you get brown spots), cinnamon, and sugar. I cut out rounds of dough using a cookie cutter and baked them for about 10 minutes at 350-degrees. Then I melted some chocolate and spread a thin layer on one side of the phyllo "cookies." Done!

The mousse filling was 8 oz of finely chopped semi-sweet chocolate and 8 oz of cream. Scald the cream and pour it over the chocolate while the cream is still piping hot. Don't stir it--cover with plastic wrap and let sit for a few minutes. Then when you stir it, the chocolate is already melted and blends evenly into the cream. I also added some espresso powder and Kahlua because I wanted a coffee flavor, but you couldn't really taste the coffee. Often with chocolate and coffee, the coffee ends up just enhancing the chocolate flavor. Who's complaining?

Let the chocolate-cream mixture chill in the fridge for an hour or so and then whip it up using an electric mixture. Whip just until you get some body to the mousse. If you over-whip it, the mousse gets grainy (which you can correct by adding more cream. Who's complaining?).

Fill a pastry bag with the mousse and pipe it onto one of the phyllo cookies. Top with another cookie and you've got yourself a nice little treat! I melted some white chocolate and piped it onto the tops of the sandwiches for a little artistic flourish.

There ya go! Midnight snack of champions, I say.

Thursday, November 08, 2007

Rollin' rollin' rollin', keep that rally rollin'!!

One of the best advantages to working at the Noodle Factory is being in a primo localation for any Happenings of Interest in the downtown area. Point in fact: The Red Sox Rolling Rally! And because of COURSE I'm a die-hard Red Sox fan, of COURSE I HAD to go down to watch the rally of COURSE. I mean, like, duh! We're in Boston, people!

So please pardon my momentary lapse into Red Sox Fan-dom. We'll be back to our regularly scheduled Daisy Dukes and Culinary School updates in a moment.

The Rally View from my office. Crazy fans started lining up at about 8am. ETA of the rally? 11:30am:

And Mr. Terry "El Hombre" Francona hisself, looking quite pensive and reflective on his win:
And I had to include this shot because that VERY NICE AND NOT AT ALL ANNOYING lady in front of me so perfectly masked Francona's face with her enthusiastic thumbs up. How did she do that?:

Josh Beckett and his smirk:

Curt Schilling givin' it up for the crowd while Josh types a text message:

Drop Kick Murphy's:

Manny and Ortiz sharing a special moment:

Yoooouuuuk!!!:

And last but not least, my boyfriend Mike Lowell:P.S. Mike and I were steady waaaaay before the whole MVP thing. We've definitely been an item since at least mid-season.

Friday, October 26, 2007

Photo of the Week

Hmm....apparently this whole idea of blogging my experience of being in culinary school is....not so much happening. Oh, I mean, I'm experiencing all right. I'm experiencing all kinds of crazy, bizarre, blog-worthy happenings. But somehow, the part where it actually gets, you know, posted to my blog? Hmm, not happening. Or at least not happening quite as frequently as I oh-so enthusiastically imagined back when I still did things like go to bed before midnight and had pass-times other than cooking. Funny, huh? (For purposes of full disclosure, this fantasy of having all sorts of time for blogging was usually followed by a day dream of being 'found' by someone begging me to write a witty-yet-touching book about my harrowing adventures in culinary school.)

Anywho, I might not be writing very much, but I'm certainly taking tons of photos. Yup, a whole backlog of awesome food s
hots and chefs-in-training and things on fire (oh yeah!). So I'm thinking that I'm going to start posting a weekly photo or three, just to keep y'all in the loop. I'll let you know when the talent agent starts begging me to be the next Super Star Food Photo Journalist, kay?

And so, without further ado, here is your photo of the day: Gateaux St. Honore. It's a pretty shmancy little number. The base is pate sucre (a.k.a. sweet pie crust). On top of the pie crust is a hollow ring of puff pastry, with several cream puffs strategically perched for an extra dose of decadence. The center of the ring and the cream puffs are filled with pastry cream--in this particular case, a pistachio pastry cream that was so wonderfully creamy and so
astoundingly pistachio-y that I could have brushed my teeth with it every day, to hell with cavities. The ring is glued to the pie crust with caramelized sugar and then the puffs are glued to the ring the same way. We used the excess sugar to make the cage in the center of the cake and the decorations for the cream puffs.

The cage and decorations are one of those oh la la! things that are actually super easy to make (shhhh....don't tell!) For the cage, we sprayed the und
erside of a soup ladle with non-stick cooking spray, then dipped a spoon in the sugar, and gently shook thin ribbons of the sugar over the ladle. You let the ladle cool and then gently ease off the cage. For the decorations, we shook designs onto parchment paper. When the sugar cools and hardens, you can unpeel the parchment paper and...oh la la! shmancy decorations! Easy peasy!

The key in all of this is working with the sugar when it's still warm, but not too hot and not too cool. If you dip a spoon into the pot and shake ribbons over the sugar, the ribbons should hold for just a second before melting back into the sugar. If you don't get ribbons at all, it's too hot. If the ribbons hold for too long, your sugar is probably almost too cool to work with. Once the sugar cools, it hardens into a big mass of teeth-cracking caramel that doesn't re-heat very well.

Ok, just one more picture:
Oh, pistachio pastry cream. I do love you. [drool drool drool]

Wednesday, October 17, 2007

Wednesday Roundup


Currently reading:
Animal, Vegetable, Miracle: A Year of Food Life
by Barbara Kingsolver


Yeah, so...um...I didn't get very far with Seven Storey Mountain. Yeah...oops. That's because I was completely swept away by Barbara Kingsolver's latest book, Animal, Vegetable, Miracle. I have been an avid Kingsolver reader for several years, but was so annoyed by the preachy environmentalism masquerading as fiction in her book Prodigal Summer that I haven't ready anything she's written since. When Animal, Vegetable, Miracle first came out, I rolled my eyes and walked right on by.

And then picked it up off of a friend's coffee table, read the first page, sat down on the couch, read a little more, and couldn't put it down. I think what turned me off about Prodigal Summer was the underhanded way that (I felt) Kingsolver pushed her environmental agenda onto the reader. It felt passive aggressive, overly defensive, and forced. But in Animal, Vegetable, Miracle, Kingsolver can be direct and honest with the reader about her views, and the resulting book feels like conversation between the reader and Kingsolver. A conversation that perhaps takes place in her cozy kitchen while canning tomatoes or flipping through poultry catalogs.

Anyways, it's a good read, especially at this time of year when the summer bounty is winding down and hot tea starts to sound like a mighty fine idea.

Speaking of which...

Currently drinking:

Nutcracker Sweet Tea from Celestial Seasonings

Earlier in the summer, my good friend Dave arrived in my cube all a-flutter and grinning from ear to ear. He held out a box wrapped in Christmas paper: "Open it! Open it!" By this point, he was hopping from foot to foot and giggling a little, so I tore off the paper in about two seconds and revealed....an entire box full of Nutcracker Sweet Tea. That's right, Dave had heard my cry for a dependable supply of Favorite Tea Ever, and went straight to the source: Celestial Seasonings Mecca and got me six whole boxes of Nutcracker Sweet Tea. All for me! To ration or splurge as I please! Oh, Dave, did I ever tell you that you're my hero? Yes, and also the wind beneath my wings.

At the time, I had one lonely box of tea that I'd been slowly rationing out. Then it got hot here in Boston and hot = iced coffee, and for whatever reason, it's only been this last week that I cracked the first box of Favorite Tea Ever. And it's so timely since just this week, fall arrived. Just like that. Sweater time!

Currently Knitting:

Not a sweater, alas. No, it's that time of year when I still believe I can really truly finish all my knitting projects in time for Christmas. Yes, like any true Red Sox fan, I still believe.

And yes, pictures of the Daisy Dukes to come. Sorry it's taken me so long. Sorry sorry sorry! They're done, actually, but just haven't gotten photographed. To come. To come. The best is yet to come.

Currently eating:

Calzones!

I need to do a separate post about this asap as this is my new favorite thing ever. It's essentially my recipe for pizza dough (HERE) split into eight pieces and folded into calzone-shape. I spread out the dough into a palm-sized round on a piece of parchment paper, put a few spoonfulls of filling, fold it over into a half-moon and pinch it shut. Leave the parchment paper around it (the paper comes off in the oven) and cut a few steam vents in the size. I bake these on a baking sheet in the oven because the filling tends to ooze out and get all over my oven (which is always perfectly clean. Of course.). That's it! They're about 3.5-4 Weight Watcher points each, depending on the filling and they freeze like a dream. I made a double batch this past weekend--sixteen calzones! I had a whole production-line going there. These are perfect for how crazy my life is these days--I leave a bunch in the freezer at work for lunches and throw one in my bag to scarf down between lecture and lab on class nights. Yum!

What else?....mmm...that's about it. That's about all I have had time for! Well, that and watching America's Next Top Model. (Go, Bianca! So fierce!)

Later, gators!

Sunday, October 07, 2007

Husk Cherries: A Love Story

Husk cherries stole my heart this summer. They rustle in your hand, weighing nothing and smelling of dust. It seems impossible that inside each paper lantern can hide one single golden berry. They're the humble Cinderella of the farmer's market, for sure.

I walked by them for weeks, achingly curious about what wonderful delight could go for $5 a half
pint, until I finally caught one of the farms offering samples. I hovered nearby, pretending to inspect a box of bean varietals while sneaking covert glances at the farmer's demonstration of the proper way to husk these cherries. He grasped the fruit by the stem and gently pinched the shell until the berry popped out the bottom. Denuded berries were passed and sampled. The reaction from the crowd was mixed. A few "mmm..."s and some "Huh"s. One or two folks paused dramatically before saying "Now that's different" and wandering off. My heart fluttered. Could my summer crush really be a bust? When the group departed, I sidled in and casually picked up one of the remaining samples.

"Ever had a husk cherry before?" The farmer asked.
"Me? Um..." (As a chronic know-it-all, my first instinct is always to feign experience.) "Well, actually no."
"Oh great!" He said with real enthusiasm, "You'll love these!"


And without further ado, he popped a marble-sized berry into my open palm.
I looked at it dubiously. It was yellow-orange (I'd been expecting red). I could see thin veins running just underneath the taut skin. I gingerly lifted my hand, rolled the berry into my mouth, and bit down. The skin broke without any resistance and my mouth was filled with the subtle, caramelized flavor of just-baked cinnamon bread. I kid you not. I thought immediately of bread. And my second thought was, "Omigod, omigod, omigod, what can I DO with this fruit?"

I've seen them called husk cherries, ground cherries, husk tomatoes, and cape gooseberries (though I think the last one is actually a different variety). These guys are indeed cousins to the similar-looking tomatillo, as well as to tomatoes and wild tobacco. The taste is described as vanilla pineapple, which I was able to agree with upon extensive further sampling and a gentle "down, boy" to my baker proclivities. I would also add "honey" to that description. They range in size from pea-sized to plump marbles like the one I first sampled. In my research, I also discovered that this plant is in the "endangered" section of the Slow Food USA Ark--Rock on, Boston-area farmers! I also found evidence that this would make an excellent container plant. I happen to have several containers and a "warm but not too sunny" back porch....see where I'm going with this? (Yup, already planning next summer's garden and it's not even November yet. This is going to be a long winter.)

So what CAN you do with a handful of husk cherries? The flavor is so subtle that it can get easily overwhelmed by other fruits, so they're perhaps best as solo-players in a green salad, thrown into a fruit-mix or paired with a subtle-yet-tart fruit. They're high in pectin, so if you can afford it or steal enough from friends with CSA's, you can make some very lovely jam. One site I found
recommended dipping them in chocolate, which immediately sent my salivary glands into over-production. Personally? I couldn't let go of that first baked-bread taste and have had visions of tartlettes dancing in my head.

Actually, I can't
claim that I actually set out to bake a tart. A few weeks ago I was setting out to bake a plum tart (you know, to practice my pate brisee) for a friend who had just returned from a jaunt in La Jolie France. I had just admitted to myself that I didn't have as many plums in my fridge as I thought when my friend walked in with a bag of husk cherries to share. I looked at my handful of plums. I looked at the bag of husk cherries. A little niggle in my brain reminded me of some candied ginger I'd been saving for a special occasion. Brilliance ensued. And here is the recette, in honor of my friend the Tart Savior:

Rebekah's Plum and Husk Cherry Tart

Pate Brisee:
1 1/2 c. flour

3/4 tsp salt

9 TBS cold, unsalted butter, cut into 1" p
ieces
4-5 TBS ice water


I'll do a longer tutorial on how to make classic pate brisee later on, but here's a basic method:


Combine the flour and salt on your counter top. Use a pastry scraper to cut in the butter
until you get pea-sized chunks of butter (you can use the tips of your fingers to break the butter, too, but be careful that the butter doesn't get too warm). Add the water one tablespoon at a time and use just the tips of your fingers to incorporate it into the dough. When you can squeeze the dough in your hand and it doesn't fall apart, stop adding water. Gather it into a ball pat it into a thick disk. Cover with plastic wrap and refrigerate for one hour.

Plum and Husk Cherry Filling:
~10 oz of tart golden plums (weighed un-cut with the stone in), cut into slices

1 pint husk cherries, husks removed

1/2 c. candied ginger

1/2 c. sugar

zest of 1/2 lemon

zest of 1 orange

1 tsp vanilla

1/2 tsp cinnamon
1/4 tsp nutmeg
2 TBS flour


Combine all ingredients. Cover and set aside while preparing the dough. (The liqui
d in the plums will dissolve the sugar to make a thick paste. At this point, you can taste a bit and adjust the flavorings to your liking.)

Preheat ov
en to 375-degrees.

Roll the dough out into a rough, 10" circle of even thickness. Lift the dough frequently as you roll and flip it over to make sure it doesn't stick to the co
unter. Use a light dusting of flour if things start to get sticky. This is a rustic tart, so the exact size of the crust doesn't need to be exact. Transfer the crust onto a baking sheet lined with parchment paper. Pour the filling into the center of the pie crust and spread it to within 4-5 inches of the edge of the crust.

Looking at the crust as the face of the clock, fold the lip of the dough over the filling at 12:00. Next fold the lip over at roughly 2:00.
Then at 4:00. Then at 6:00. Then at 8:00. At 10:00, fold the lip over but then unfold the 12:00 fold partway to tuck the 10:00 fold under so that all the layers fall in the same direction. Brush the top with egg or milk thinned with a little water.

Bake for about 40-50 minutes, until the crust is a deep golden brown. Let c
ool for about 15 minutes before serving. Sprinkle the top of the tart with Demara sugar (or the spiced gold sugar mix from THIS place) just before serving. Enjoy!