-->If you're curious about all the different kinds of wine, how wines are made, what goes into a 'vintage' and all that general wine-knowledge, check out this article on Epicurious:
http://www.epicurious.com/drinking/wine/ewg/step3
The article gives a good overview to the whole wine scene and a good jumping off point for learning more.
-->And here is a fun photo-essay of wine-making from crush to barrel at Chow.com:
http://www.chow.com/stories/10183#
This photo essay is light on the actual facts, but it's fun to put a visual image with all the vocab words like "lees" and "steel fermenters"!
Tuesday, October 31, 2006
Sunday, October 29, 2006
Cooking: Comfort Cookies
 I grew up in the Midwest during a time when going out to eat was still considered a rare luxury and the whole idea of 'take-out' was still catching on. We had the odd Pizza Hut pizza, and I can distinctly remember a few celebration meals at Sarah's, a bone fide American steak house in Algona, Iowa. But for the most part all of our meals were cooked and eaten at home. My parents both cooked--Dad mostly managed the garden and made the breads and soups, and Mom...well, Mom did pretty much everything else. From a young age, my brother and I were corralled into chopping vegetables, stirring soups, punching down bread doughs (ok, we actually fought over who got to do that one), cutting fruit for salad, and a host of other meal prep tasks.
This all sounds very wholesome and apple-cheeked, I'm sure, but in reality, my brother and I fought all this home-cooking tooth and nail. Whole-wheat bread tasted gross and the slices were too thick for sandwiches. Home-made cookies weren't "cool" enough when packed into school lunches. Hamburgers that didn't come from McDonald's just weren't the same. We adored Halloween with its abundance of commercially-made sweetness. I'm sure Mom and Dad thought they'd given birth to palate-challenged morons, but still, they persevered. A few 5-minute time outs on the back stairs and commands to eat now-cold plates of brussel sprouts (grown in our backyard, of course) didn't faze them in the least.
Still, something must have stuck because my brother is happily employed as a line cook in a restaurant in Wisconsin, and here I am gleefully spending a Sunday afternoon dividing my time between my foodie blog and going through back issues of Bon Appetit, Saveur, and Gastronomica. In the past few months, my mother has repeatedly said, "I never would have thought this is what you and Andy would end up getting into"--always in the same slightly incredulous voice.
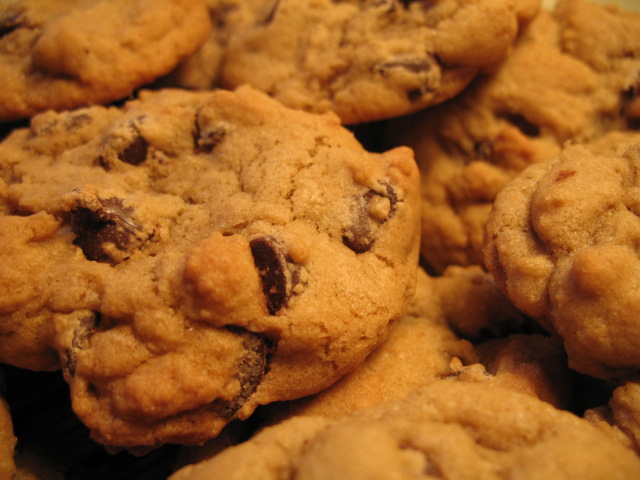
So when I find myself in need of some comfort food, what I crave is chili that's been simmering all afternoon, thick-sliced bread--toasted and buttered, and perhaps most of all, home-made chocolate chip cookies. It could be that I love these chocolate chip cookies just because they're familiar, but I haven't found another cookie anywhere else that I would take over my mother's. A few years ago when I was first living on my own and had a hankering for them, I called her up one afternoon and--for the first time ever--asked her for the recipe.
This recipe is basically the same recipe that's off the back of the Nestle chocolate chip bag, but with a few modifications of ingredients and procedure. First of all, use only one stick of butter instead of two. Surprisingly, the reason for this is not to cut down on the fat but to improve the texture of the cookie. More butter will make the cookie flatter and crispier. Less fat makes a denser cookie that is chewy without being cake-y.
Second (and this is my own modification), use dark brown sugar instead of light brown sugar. Dark brown sugar gives the cookie a deeper flavor with the subtle taste of molasses. I feel this creates a nice balance to the sweetness of the white sugar and compliments the semi-sweet chocolate.
Third, all of the ingredients should be room temperature, especially the butter and eggs. It's best if you let them come to room temperature on their own, but in a pinch you can microwave the butter for a few seconds until soft and put the eggs in a bowl of hot tap water for about 5 minutes.
And fourth, add the flour last (except for the chocolate chips) and mix very little to avoid forming any gluten. Developing the gluten in the flour will make your cookies hard and tough. You want a little gluten development for the chew (which is why you use all-purpose flour instead of pastry flour) but not too much.
Everyone has their own version of the perfect cookie, and this one is definitely mine. Chewy and moist, plenty of chocolate chips, not too sweet--it takes me right back to those school lunches trying fruitlessly to trade them away for Kudos bars and Chips Ahoy. But really? I was just as glad to keep them for myself.
-----
Francis Family Chocolate Chip Cookies
modified from Nestle's Chocolate Chip Cookie recipe
Makes about 36 large cookies or 72 small cookies.
3/4 c. white sugar
3/4 c. dark brown sugar
1 stick real butter (softened)
2 eggs (at room temperature)
1 tsp vanilla
1 tsp salt
1 tsp baking soda
2 1/4 c. all-purpose flour
~2 c. (about 1 bag) of chocolate chips
Preheat oven to 375 degrees.
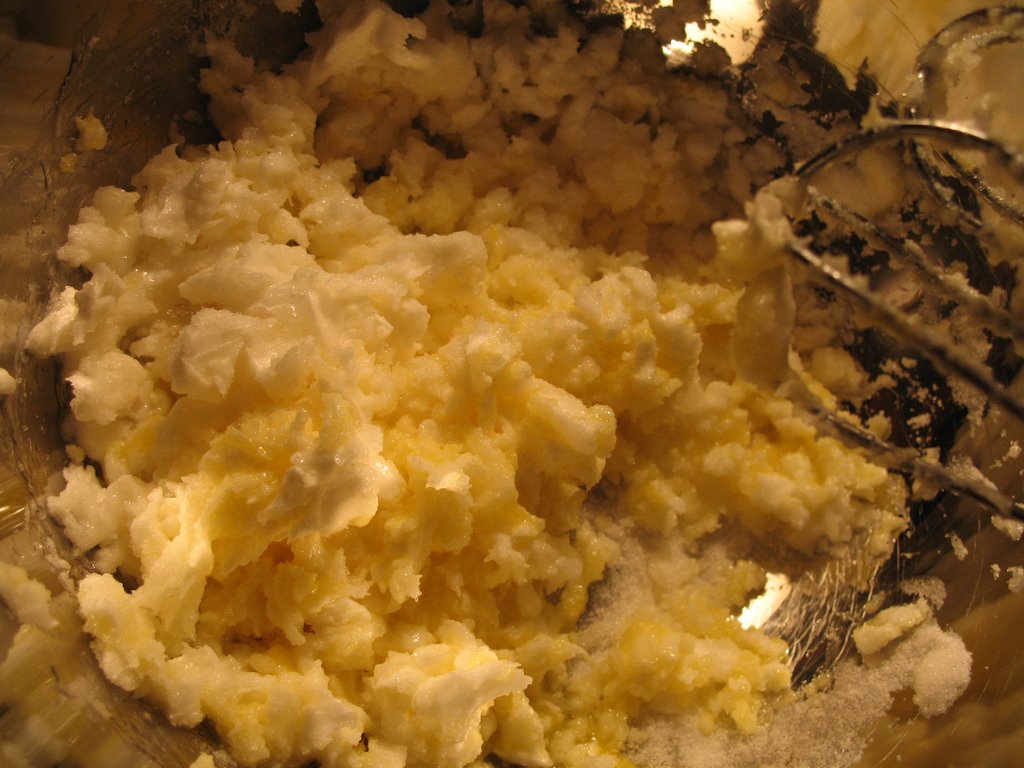
Mix the two sugars together in a medium sized bowl. Mix in the butter gobs at a time. Mix in the eggs and vanilla, and then the salt and baking soda. Mix all of these ingredients as much as possible until the batter is smooth, shiny, and a rich brown color.
Add the flour all at once and mix as little as possible (to avoid forming gluten, which makes tough cookies). I prefer to fold the flour into the batter until it's evenly incorporated. To do this, run a long-handled spoon or spatula around the edge of the bowl under the batter. Smoothly lift the batter slightly and fold it toward the center of the bowl. Continue doing this at intervals along the entire circumference of the bowl and then continue until all the flour is incorporated. The dough will look like a grainy, light brown paste.
Stir in the chocolate chips all at once, again mixing as little as possible (and again, I prefer to fold the chocolate chips into the batter).
Drop batter onto a parchment-lined baking sheet using a full tablespoon (for larger cookies) or a well-rounded teaspoon (for smaller cookies).
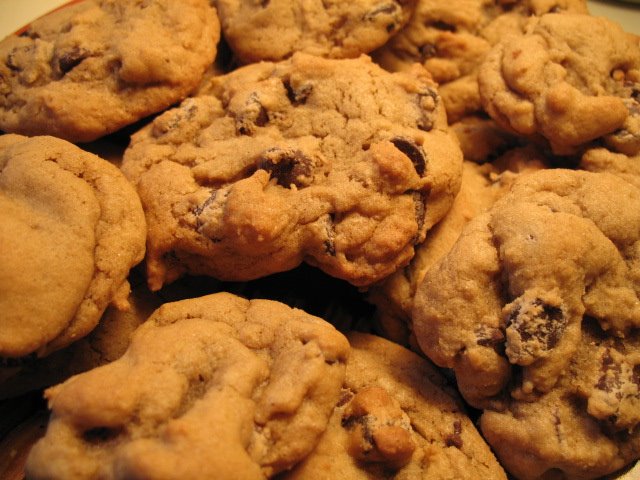 Space them about two inches apart--they will spread a tiny bit as they bake. Bake for 9-11 minutes until the 'peaks' on the cookies are just starting to brown (leave cookies in longer for crunchier cookies). Allow to cool for about 5 minutes on a cooling rack before devouring. (I know it's hard, but it's worth it. If you eat them right away, not only will you burn your tongue and thus not be able to enjoy anymore tasty treats for a while, but when it first comes out of the oven, the cookie is actually still quite liquidy and will collapse on itself and on you until it has a few minutes to set.)
-->Large cookies are about 3 inches in diameter and are about 3 WeightWatchers points each.
-->Small cookies are about 1.5 inches in diameter and are about 1.5 WeightWatchers points each. (By the by, these smaller cookies definitely do not feel skimpy. They pack the same flavor, chew, and chocolate as the regular cookies--they're just portion controlled. I think the small cookies are the perfect size for feeling like you really had a good, satisfying treat.)
Cooking: Plonk Wines
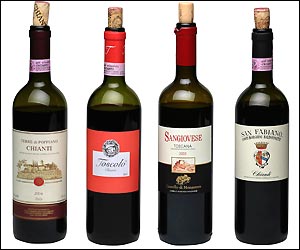 I just discovered that the Boston Globe has a column devoted to the best plonk of the month. The explanation of the column from their website:
 "This is a monthly column on $10-and-under wines we call "plonk," which began as British slang for the cheapest drink served, and is now widely used to mean simple, inexpensive bottles. "Plonk of the month" appears on the last Wednesday of the month and is posted on Boston.com.
Wines are selected to go with the season, so winter's heartier fare might lean more toward reds, but whites appear more often as the weather warms. We list several shops where you can buy these bottles, but check with your local merchant."
 Here's the link to this month's column: http://www.boston.com/ae/food/gallery/plonk_september/, as well as a backlisting of their columns for the last few months. The Globe has also recently published an article entitled "Plonkapalooza" wherein they tasted 50 wines sold for around $10 or less per bottle and chose their favorite top 10: http://www.boston.com/ae/food/articles/2006/10/25/plonkapalooza/. Three cheers for good wine on the cheap!
Monday, October 23, 2006
Crafts: Aid-and-Abet Smoker's Gloves
For those of you just joining us, a few weeks ago, a co-worker and friend of mine finagled his way into getting me to make him a pair of customized, extra-warm smoker's gloves. And by "finagle," I mean he offered to buy the yarn and a pair of needles and I was sold. We've all got our weaknesses, ya know?
And the truth is, whether you're a smoker or not, these gloves are mighty handy. It gets gosh durn cold here in Boston. And who suffers most? That's right: our fingers. Even if you or the recipient of your knitted goodies aren't smokers, these mittens are still perfect for grabbing billfolds out of bags, snagging hot pretzels from street vendors, and all your other wintry shenanigans. I'm thinking of knitting myself a pair--once I'm done with all the other projects I've got up in the air, of course. (Of COURSE! Who needs another project? Not me! Hee hee...hee. Oh dear.)
When all was done and knit, my pattern was really nothing like the original Cigar pattern off of which I had been basing my gloves. So I will give a nod to Mr. Cigar and claim this cousin as my own, thanks very much. For all interested parties, here is the Aid-and-Abet Smoker's Gloves pattern and other sundry details. (Apologies in advance if there are formatting errors in this pattern--MS Word and I have been having...issues with each other. If you're interested in knitting this pattern, e-mail me at mythreeloves (at) gmail (dot) com and I'll send it to you in an attachment.)
Oh, and P.S. if you're not really interested in the pattern details, but wanna see some groovy pictures of the gloves, scroll on down to the bottom!
Size
S [M, L]
Weave in all loose ends.
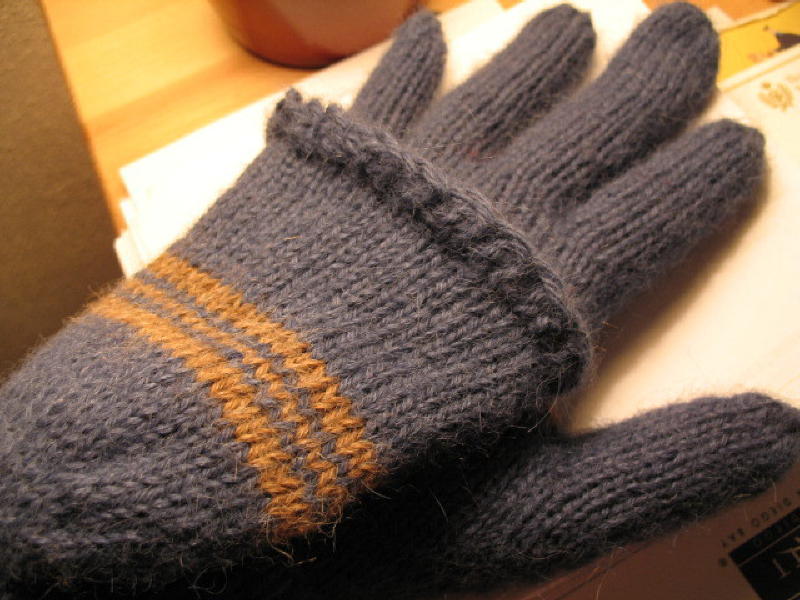
 Finished left-hand glove
 Finished left-hand glove with mitten flap, back side.
 Finished left-hand glove with mitten flap, palm-side.
 Finished right-hand glove
And the truth is, whether you're a smoker or not, these gloves are mighty handy. It gets gosh durn cold here in Boston. And who suffers most? That's right: our fingers. Even if you or the recipient of your knitted goodies aren't smokers, these mittens are still perfect for grabbing billfolds out of bags, snagging hot pretzels from street vendors, and all your other wintry shenanigans. I'm thinking of knitting myself a pair--once I'm done with all the other projects I've got up in the air, of course. (Of COURSE! Who needs another project? Not me! Hee hee...hee. Oh dear.)
When all was done and knit, my pattern was really nothing like the original Cigar pattern off of which I had been basing my gloves. So I will give a nod to Mr. Cigar and claim this cousin as my own, thanks very much. For all interested parties, here is the Aid-and-Abet Smoker's Gloves pattern and other sundry details. (Apologies in advance if there are formatting errors in this pattern--MS Word and I have been having...issues with each other. If you're interested in knitting this pattern, e-mail me at mythreeloves (at) gmail (dot) com and I'll send it to you in an attachment.)
Oh, and P.S. if you're not really interested in the pattern details, but wanna see some groovy pictures of the gloves, scroll on down to the bottom!
Size
S [M, L]
Finished Measurements:
Width: 3.5 [3.75, 4] inches
Length: 9 [9.5, 10]
* 100% light worsted wool; 330 yd/297 m/150g (Shown in Plymouth Indiecita Alpaca (3 skeins)
* 1
* Waste yarn
*Tapestry needle
25 sts/32 rows = 4 inches in stockinette
Pattern Notes:
The only tricky thing with these gloves is keeping the left one and the right one straight while you’re knitting. The right glove will have fingerless index and middle fingers (switch hands if knitting for a left-handed person), and each respective glove will have a row of purled stitches across the back of the hand—this is where you’ll pick up stitches to begin the mitten flaps on each hand. If you confuse the gloves, you’ll end up with a purled row across the palm instead of the back of the hand.
Directions for Gloves (make 2):
Using either the Magic Loop circular knitting method or 4 double pointed needles, CO 36 [40, 44] and divide stitches evenly between needles. Join and begin working in the round.
First Round: [
Repeat round until work measures 2.5 [3, 3.5] inches (about 20 rows [24 rows, 28 rows])
Thumb Gusset
Next round: K all sts.
Increase round: K1, m1, k to end of round, m1.
Repeat these 2 rounds 5 times more. (48 [52, 56] sts)
Next 4 rounds: K 3 rounds. Work one increase round.
Repeat these 4 rounds 1 [2, 3] times more. (52 [58, 64] sts)
Next round: K to last 6 [7, 8] sts, place next 13 [15, 17] sts on waste yarn. (You will pick up these stitches later to make the thumb.)
Next Round: CO 1 st, rejoin round and k all sts. (40 [44, 48] sts)
K 4 more rounds.
Next round:
Right Hand: K 20 [22, 24] sts, p 20 [22, 24] sts (You will pick up these purled stitches later to begin the mitten flap.)
Left Hand: P 20 [22, 24] sts, k 20 [22, 24] sts
Next round: K 3 [4, 5] more rounds.
Next round: K16 [17, 18] sts, place next 8 [10, 11] sts on waste yarn (you’ll pick these up later for the pinky finger), CO 2 sts, rejoin round and k remaining 16 [17, 19] sts. Next round: K 5 [6, 7] more rounds. Index Finger K6 place next 22 [24, 26] sts on waste yarn, CO 3, rejoin round and k to end of round. (15 [15, 16] sts) Right Hand: K 8 [9, 10] rounds (or until stitching reaches the bottom of the first knuckle). BO very loosely. Left Hand: K 25 [28, 30] rounds (or until stitching just reaches the tip of the finger or slightly beyond). Next round: [K1, K2tog] until end of round Next round: K2tog until end of round. Break yarn leaving a generous tail, draw the tail through the remaining sts, and pull tight. Middle Finger Working sts clockwise (so knit stitches face outwards), pick up and k 3 sts in CO sts from Index Finger, pick up and k 5 [5, 6] sts from waste yarn on one side of hand (next to Index Finger), CO 3, pick up and k 5 [6, 6] sts from waste yarn on other side of hand (next to Index Finger). Join to work in the round. (16 [17, 18] sts) Right Hand: K 9 [10, 11] rounds (or until stitching reaches the bottom of the first knuckle). BO very loosely. Left Hand: K 30 [33, 35] rounds (or until stitching just reaches the tip of the finger or slightly beyond). Next round: [K1, K2tog] until end of round Next round: K2tog until end of round. Break yarn leaving a generous tail, draw the tail through the remaining sts, and pull tight. Ring Finger Pick up and k 3 sts in CO sts from Middle Finger, pick up and k remaining 10 [11, 12] sts on waste yarn next to Middle Finger, and join to work in the round. (13 [14, 15] sts) K 25 [28, 30] rounds (or until stitching just reaches the tip of the finger or slightly beyond). Next round: [K1, K2tog] until end of round Creepy-looking half-finished glove. I've just picked up the stitches being held for the ring finger. The red and yellow strings are pieces of waste yarn holding the stitches. Close up of picked-up stitches on the ring finger. The top three stitches were picked up from the cast-on stitches in the middle finger and the bottom stitches were being held on waste yarn. I'm about to knit the first round. Pinky Finger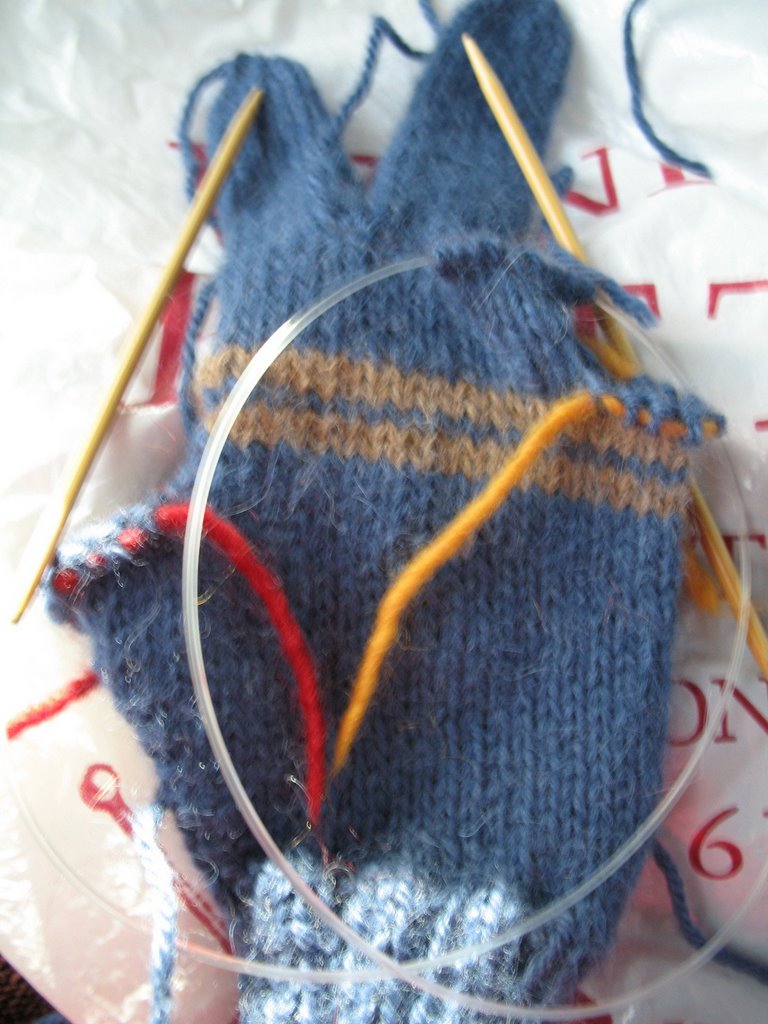

Pick up and k 4 sts in the CO next to the held sts for the Pinky Finger, pick up and k 8 [10, 11] sts being held on the waste yarn. (12 [16, 17] sts)
K 18 [20, 22] rounds (or until stitching just reaches the tip of the finger or slightly beyond).
Next round: [K1, K2tog] until end of round
Next round: K2tog until end of round. Break yarn leaving a generous tail, draw the tail through the remaining sts, and pull tight.
Thumb
Pick up and k 3 sts in the CO next to Thumb Gusset, k 13 [15, 17] sts being held on waste yarn. (16 [18, 20] sts)
K 18 [20, 22] rounds (or until stitching just reaches the tip of the finger or slightly beyond).
Next round: [K1, K2tog] until end of round
Next round: K2tog until end of round. Break yarn leaving a generous tail, draw the tail through the remaining sts, and pull tight.
Mitten Flap
Note: Work clockwise so that the knit stitches face outwards. On the right hand, begin picking up purled stitches and begin each following round on the pinky finger side. On the left hand, begin picking up purled stitches and begin each following round on the thumb side.
First row: Pick up and k 20 [22, 24] sts from the purled row across the back of the hand.
CO 21 [23, 25] stitches (these CO sts will be the front of the mitt), and join with the picked-up sts to work in the round. (41 [45, 49] sts)
Next round: K 20 [22, 24] (across back of hand), [k1, p1] next 21 [22, 24] sts to end of round.
Next round: Repeat this round once.
Next round: K all sts a total of 34 [38, 42] more rounds (or until the tip of the mitten is about 4 rows below the tip of the middle finger.)

Half-finished mitten flap on left hand
 Half-finished mitten flap showing the join on the back of the hand.
Decrease row: K4, k2tog, and repeat to end of row.
Repeat this decrease round 3 more times.
Decrease row: K3, k2tog, and repeat to end of row
Repeat this decrease round 1 more time.
Finishing: Divide remaining sts between two needles and graft sts together using the
Weave in all loose ends.
 Finished left-hand glove
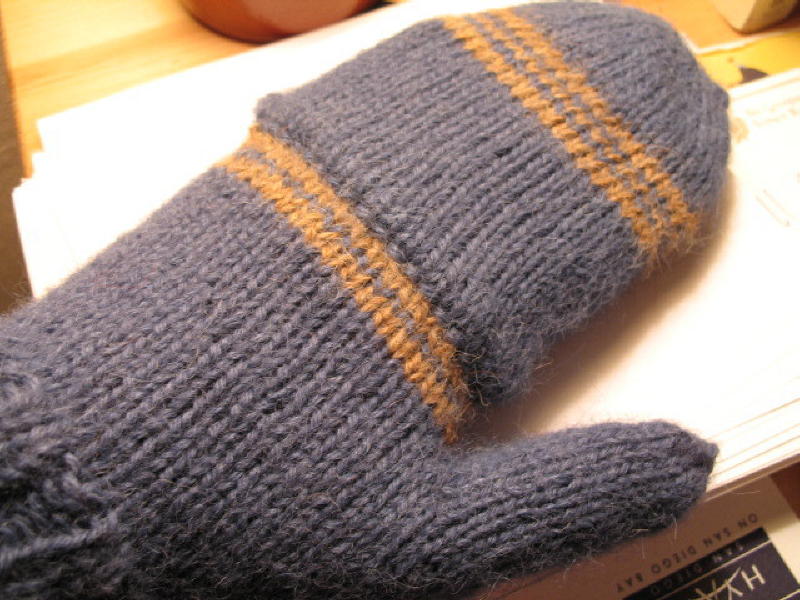 Finished left-hand glove with mitten flap, back side.
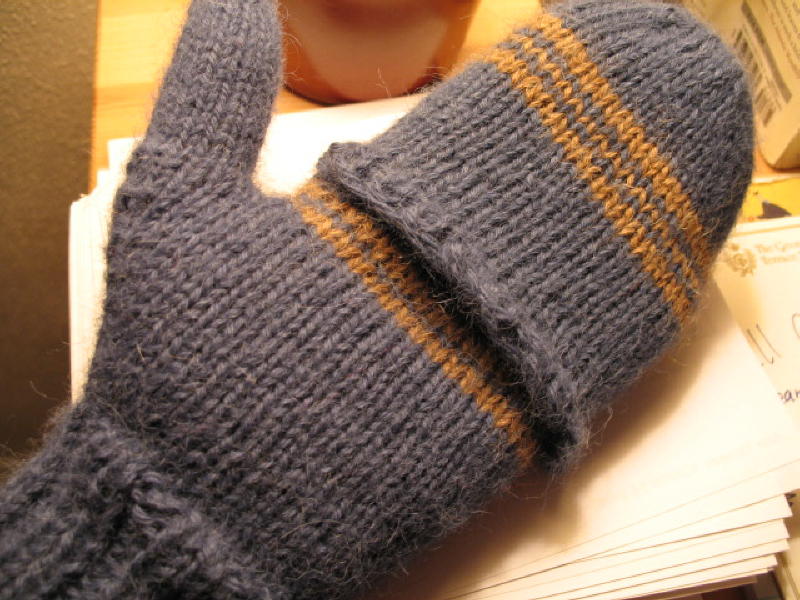 Finished left-hand glove with mitten flap, palm-side.
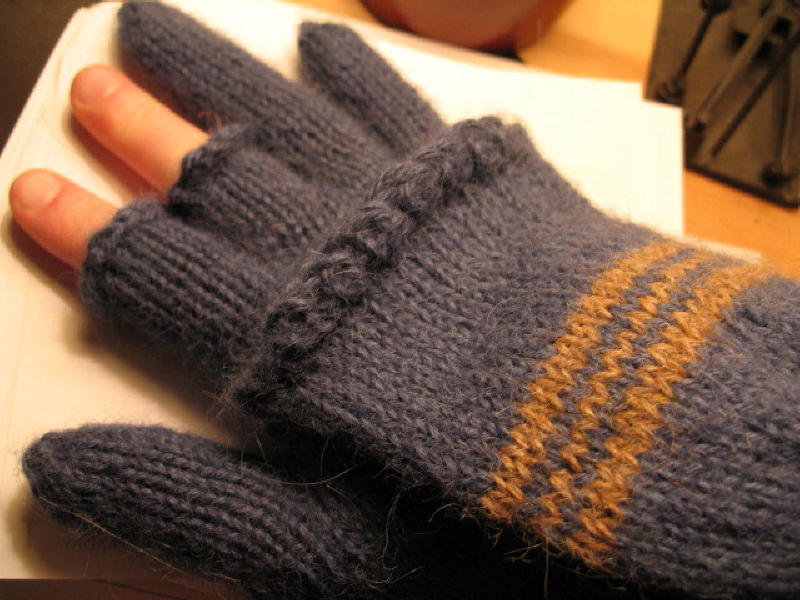 Finished right-hand glove
Sunday, October 22, 2006
Cooking: Bagels n' Brunch
 'Twas the Engineer's birthday this past weekend and we had his family over for brunch. Yee-haw, what a spread! Never was there a more perfect union of breakfast and lunch, or a better brunch been brunched. As we all sat there patting our stomachs and dabbing butter from our chins, the Engineer said, "We should really do this more often! No, really!" There was a little bit of something for everyone: the Engineer crafted gigantic omelets with cheese and ham and onions and peppers (from my garden, in fact!); we bought the "fancy" (read: slightly more expensive) bacon; the Mother of the Engineer arrived hidden behind a bowl of cut fruit that was half the size of our dining room table; the Father of the Engineer produced lox and cream cheese like a magician; tea and cider and organic pomegranate juice were drunk with reckless abandon. And what, you ask, was my contribution to this Brunch Debauchery? Well, one can't exactly have lox and cream cheese without bagels, now can one?
Bagels are one of those mythical bread products that home cooks speak about in hushed voices and with much incredulous shaking of the head. Well, the biggest mystery seems to surround this whole issue of boiling. To boil or not to boil? How long? Why boil in the first place? WTF?!
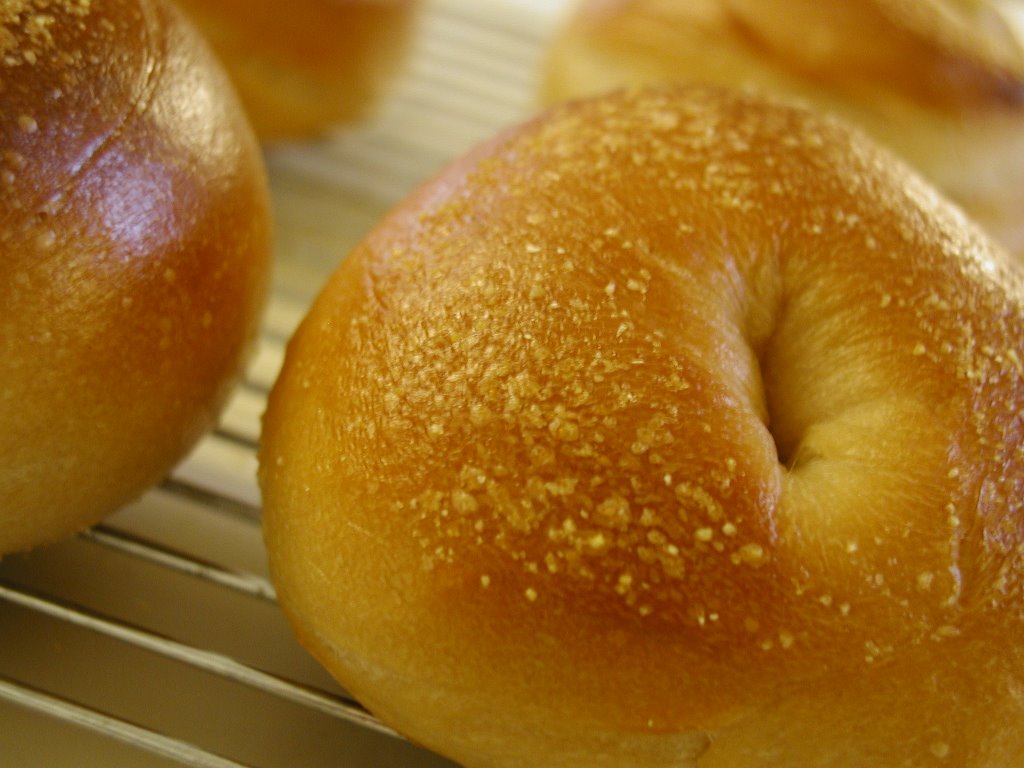 The secret to baking a good, chewy bagel is actually a combination of boiling the bagels very briefly and then baking until golden brown on the outside. Bagels should be boiled for a total of at least 20 seconds and certainly no more than 30 seconds. This is just long enough to cook the outside layer of dough, which kills the yeast on the surface (making a tight, chewy skin), caramelizes the outside starches, and gives the bagel its nice shine. Boiling the bagel for any longer just makes the skin thicker and and more inelastic, and gives you a final product as dense as a hockey puck. You want some elasticity in the skin so the bagel can still rise a bit in the oven and so that the bagel is still...well...edible.
One other essential step to making good bagels is a retarded rise (a long, slow rise at a low temperature) overnight in the refrigerator. This improves the overall taste of the bagels and the structure of the interior crumb. (For more info on the how and why of retarded rises, click HERE.) Using high-gluten flour will also help improve the internal structure and chew. It's great if you have access to it, but for the home-baker, all-purpose flour works just as well.
It takes some planning and some trial 'n error, but making good quality bagels at home is not nearly as mysterious or as impossible as rumor would have you believe. For those of you out there saying, "Bake bagels, who me? Naw, I couldn't!" Oh, pshaw, y'all! Read on:
Bagels
from Breads from the La Brea Bakery by Nancy Silverton
Makes about 18 bagels
12 oz (~1 1/2 c.) water
2 tsp yeast
13 1/2 oz (~1 1/2 c) sourdough starter*
2 lbs (~6 1/2 c) all-purpose flour
2 oz (~1/4 c) sugar
1 tbsp sea salt
2 tbsp barley malt syrup**
6 tbsp milk powder
*If you don't have SD starter, substitute 6.5 oz water and 6.5 oz flour. You shouldn't notice anything too different in the final flavor or texture--I'm just a SD fiend, so I throw it in everything!
**It took me a while to find barley malt syrup--try Whole Foods, Wild Oats, or another natural food store. (Trader Joe's does NOT carry it.) It's not 100% essential to the quality or the baking of the bagel, but does enhance the flavor.
Making the Dough
(note: bagel dough is very dense and stiff, so it's easiest to mix it in an electric stand mixer, at least for the initial mixing of the ingredients. Keep a close eye on your mixer, though, to be sure it's not straining too hard to mix the dough and wearing on the engine. Also completely fine to mix by hand.)
Step 1: Pour water into a bowl and add yeast. Allow yeast to dissolve and ferment for about three minutes, and then mix in the sourdough starter. Add sugar, salt, malt syrup, and milk powder, and stir to combine.
Step 2: Add in flour one cup at a time. This is one bread where you actually want to add as much flour as you can. Having said that, keep an eye on the dough--you don't want it to get too dry. The dough should be moist and slightly tacky too the touch, but shouldn't stick at all to your hands or the counter. The dough will be very stiff and dense. The recipe calls for 6.5 cups, but I usually end up adding about 5.5 cups.
Step 3: Turn the dough onto a floured counter-top and knead the dough for 15-20 minutes until all the flour (or as much as you can get into it) is incorporated and the the dough springs back when you press your finger into it. As the dough is so stiff and difficult to knead (dang, those arms get tired!), I recommend doing the kneading in two shifts of 10 minutes, letting it rest for about 5 minutes in between shifts.
Step 4: Cover the dough with plastic wrap and allow to rest for 10 minutes.
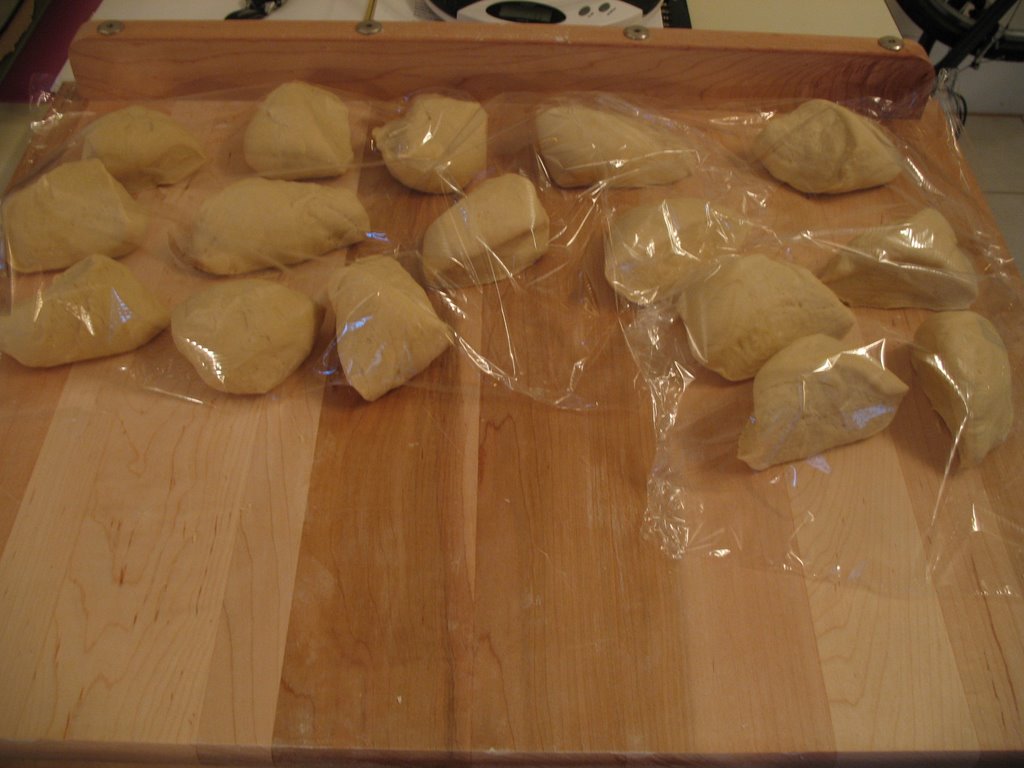 Shaping the Bagels
Step 5: Cut the dough into 18 pieces (about 4 ounces each). Cover with plastic wrap and allow to rest for 15 minutes. (These "rests" give the gluten time to relax and make it easier to shape the bagels. Without resting, the dough would tend to tighten up and spring back from whatever shape you give it.)
 Step 6: Working one piece of dough at a time, shape the dough into a rope 6-8 inches long by gently rolling the dough between the palm of your hand and the counter top. As it forms into a rope, use two palms to continue lengthening.
Step 7: Take one end of the dough rope between your thumb and forefinger.
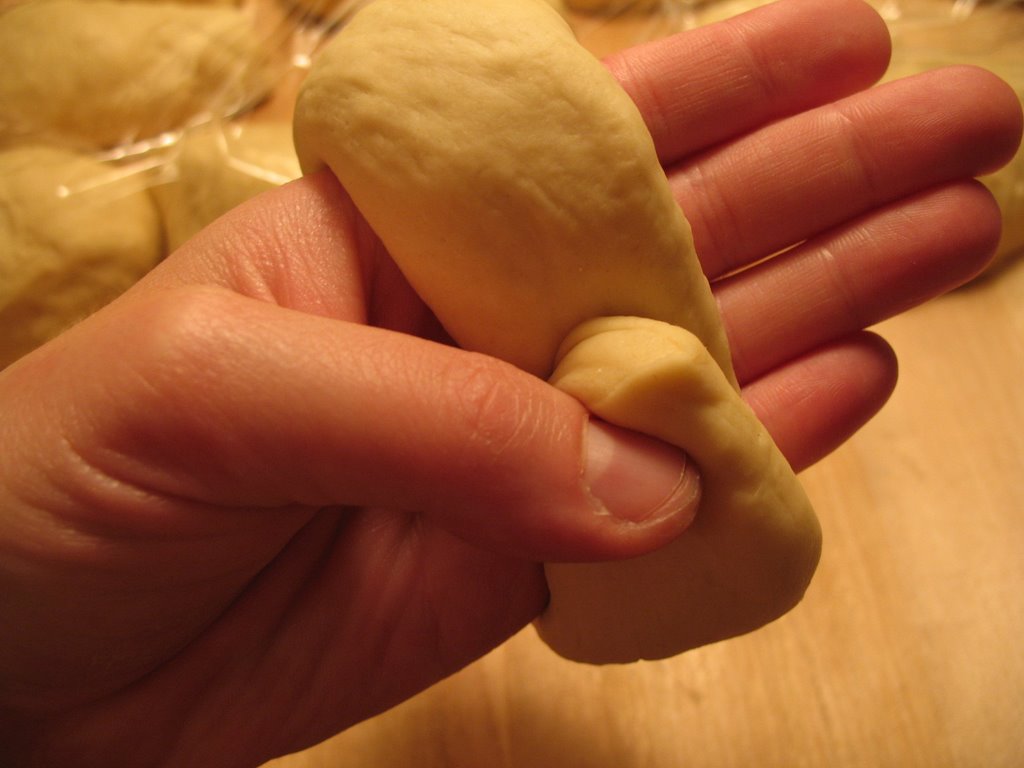 Wrap the dough around the back of your hand and overlap the two ends by about an inch or so. With the overlapped ends at the center of your palm, seal the ends by rolling the rope back and forth against the counter top
 . If the ends keep unsticking, use a dab of water to 'glue' them together.
Step 8: Stretch the finished bagel a bit to make the hole bigger and then place it on a parchment-lined baking sheet. Repeat Step 6 and Step 7 with the rest of the dough, spacing the bagels about two inches apart on the baking sheet. Cover with plastic wrap and refrigerate for 12 -24 hours (this is the 'retarding' step).

Boiling and Baking the Bagels
Step 9: About an hour before baking time, pre-heat the oven to 450 degrees. About a half an hour before baking time, set a large stockpot filled with at least 4 inches of water to boil. Just before the water begins to boil (about 5 minutes before bake time), take the first sheet of bagels out of the fridge (leave any other sheets in the fridge).
Note: All you want to do here is take the chill off the bagels. Do NOT let the bagels come completely to room temperature or they will 1) stick to the parchment paper and you won't be able to boil them and 2) they will get all wobbly and lose their shape. If this happens, put the tray back in the fridge for 20 minutes or so.
 Step 10: Once the water is boiling, drop three bagels into the water. Initially, they will probably sink to the bottom and then float to the top. If the bagel hole closed up over night, you can gently stretch it out again just before dropping in the water. Let them boil on one side for 10 seconds and then flip them over onto the other side for another 10 seconds. In reality, if you're doing three bagels at a time, by the time you've put the third bagel in the water, the first one is read to flip over, and by the time you've flipped the third bagel, the first is ready to come out. Don't worry too much if you can't tell which one went in first or which ones have/have not been flipped--it's not an exact science. The idea is that the bagel has been briefly boiled and then removed from the water.
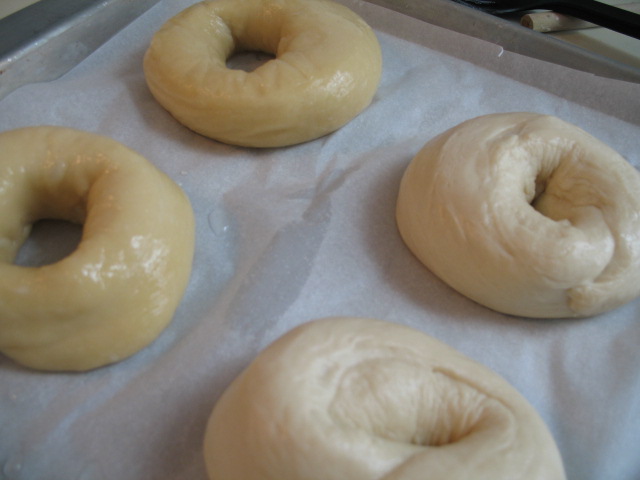 Replace the boiled bagels in their original positions on the parchment-lined baking sheet. Allow the water to return to a boil and then boil the rest of the bagels in batches. (In the picture to the left, the bagels on the left side of the picture have been boiled and the ones on the right have not. You can see that the boiled bagels have a slight caramel tint and the surface looks rubbery instead of doughy. Huzzah!)
Step 11: Once the all the bagels on the first tray have been boiled, bake them in the oven for a total of 20 minutes. Rotate the bagels about halfway through for even baking. Keep an eye on them--depending on your oven, they might be done sooner or later than 20 minutes. You're aiming for a deep caramel brown color and a shiny crust. You should see little 'fish eyes' on the
 surface of the bagels--little bubbles in the crust where carbon dioxide was trapped (click on the image to the left to enlarge it and you can see the fish eyes).
Repeat with any other trays of bagels. Unlike regular bread that needs a longer cooling time to set the crust, bagels can be eaten immediately. They are best served when they've cooled just enough to be able to bite into them without burning your mouth. Any leftovers will keep in a zip lock bag or Tupperware for about a week and are fantastic toasted.
Saturday, October 14, 2006
Cooking: Red Truck Wine
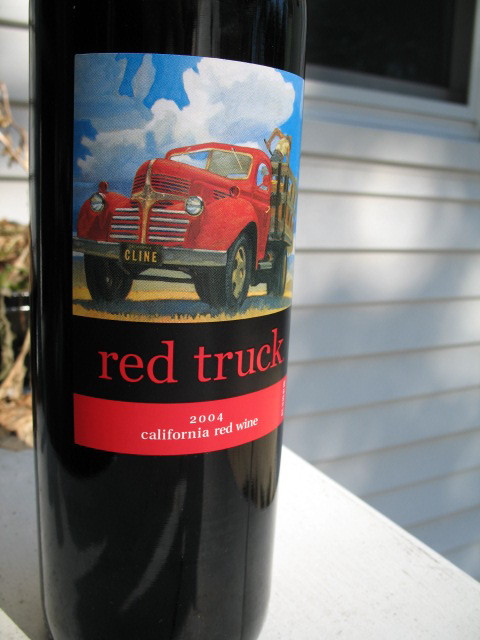 I don't think anyone would ever confuse me for a 'picky' wine drinker. Only once can I remember loathing a bottle so much that I actually poured it down the drain: a particularly atrocious and vinegary red that I couldn't even bear to use in tomato sauce. Occasionally I find myself present at a dinner where a sample of some $50+ bottle of wine finds its way into my glass. (Yay verily, it is good to know folks with expense accounts. Yay.) But really, I'm quite happy sticking to the top half (ok, top quarter) of the wine list, and I find myself pretty happy with everything in that range. For reds, I like syrahs, Chiantis, and Merlot. For whites, I go for pinot grigio and pinot gris. My standby red is Yellow Tale Shiraz (retails at about $7), and my go-to white is Grigio Luna (retails at about $5.50). In my opinion, these are good, solid, dependable wines that are always good in a pinch.
But then a few weeks ago, something happened that caused my hand pause, hovering uncertainly, on its familiar course toward the Yellow Tail and my eye wander nervously toward the rows of neighboring wines. I had come across a blog called "The Cellar Rat" by Alan Baker: a blog discussing all things wine-related wherein he finds nothing shameful in picking from the top of the wine list and enjoying a bottle for $10. He says as long as you enjoy it, drink it. On his blog and in his podcasts*, he documents his exploration of the wine-making industry from the vine to the bottle. Baker worked in broadcasting in Minnesota for years, and then about two years ago, decided he was in need of a life change and moved to California wine country to explore the wild and gnarly world of wine making. He worked at a vineyard for a season and is currently experimenting with bottling his own "Rat Cellar" wine. His blog and podcasts include everything from explanations of the wine making process and wine vocab for the layman, coverage of local wine-tasting events, interviews with wine-makers, and of course his own opinions on various wines. Baker's blog (with links to his podcasts) is http://www.cellarrat.org (or click HERE). Since I started listening to his podcasts, I feel like I've been given permission to go forth and sample, dismissing that which is gross, and happily collecting that which I like.
On a recent trek to Trader Joe's, I picked up a bottle of Red Truck 2004 California Red Wine for $7.99. I'd heard this wine recommended a few times over on Chowhound.com, but hadn't tried it because I'd previously assumed that blended-grape wines were "uncool." I have no idea where I got that impression, but with my new found, Cellar Rat-inspired confidence, I didn't even hesitate before putting a bottle in my cart. Now, I'll tell ya, rarely do I open a bottle of wine, take a sip, and actually stop to say, "Wow." This stuff was good! It's a blended Syrah, Petite Syrah, Cabernet Franc, and Mourvedre. It's dark and berried, but with none of the bite or acidity that I tend to associate with many dark red wines. This is a wine meant to be drunk from a tea cup and is perfect for an evening wrapped in a blanket with a good book. It would likely pair well with red meat, spicy foods, and a chocolate dessert, though I unabashedly admit that I've been drinking it by itself all evening!
I like this new freedom of wine choice. I'm hooked now, I'm afraid. What to do but sample more wine?
*If you're asking yourself, "Podcasts? What the heck are podcasts?" you're not alone. Apparently these things have been around for the past several years, but who knew? I've only discovered them recently myself and am still trying to master all the Cool Kid Slang so that I don't sound like a big McDork when I talk to all the Cool Kids. Essentially (and as far as I can tell), podcasts are radio shows that you can download to your computer or mp3 player and listen to whenever you feel like it. They're generally free and, much like websites and blogs, anyone and your mother can produce one and make it available for downloading with some basic electronic equipment. Check out the National Public Radio website (click HERE) and the New York Times website (click HERE) for some nationally syndicated ones.
Thursday, October 12, 2006
Books: The Stolen Child by Keith Donohue
The Stolen Child
by Keith Donohue
Dollar Store Plot: One summer day after an argument with his mother, young Henry Day decides to run away from home. As he hides from rescue searchers in the hollow of an old tree in the woods behind his house, Henry is kidnapped by a band of hobgoblin changelings, who have been spying on Henry for weeks and waiting for the opportunity to exchange him for one of their own. Henry, renamed Aniday after his initiation into the hobgoblins, quickly begins to forget the details of his former life and becomes subsumed in the culture of the hobgoblins. Meanwhile, instead of relishing his return to humanity, the changeling left in Henry'’s place finds himself constantly fearful of being discovered as an imposter and struggling to remember how to be human.
First off, know that this is not your typical fantasy fare. Keith Donohue weaves together fantasy and reality so seamlessly that I guarantee you'll be peering nervously into the foliage next time you pass through a patch of wilderness. The lives of both Aniday as the child-turned-hobgoblin and Henry as the hobgoblin-turned-child reflect emotions, thoughts, and events that are universal human experiences. Central to this novel are questions of identity, rites of passage, and ultimately, the realization that however much you labor to reclaim what has been lost, in the end, you can only accept and move on.
I see this novel as part of an emerging trend in fiction; for lack of an "official"’ label, I"’ll call it fantastical reality. Very different from either traditional sci-fi/fantasy or the magical realism of Gabriel Garcia Marquez and Salman Rushdie, this new genre reads very much like reality-oriented modern fiction...except with a twist. Instead of having a skin of magic overlaid on the fictional reality, wherein anything and everything is possible, the magic in this new genre is very specific, isolated, and is kept secret for fear of discovery. In The Stolen Child, hobgoblins exist. Nothing more. In The Time Traveler'’s Wife by Audrey Niffenegger, one character can time travel. That'’s all. The magic has very defined boundaries and limitations. No other kinds of magic are even hinted at or enter into conversation. (Though as the reader you might wonder what other kinds of incredible things might be true in a world where hobgoblins read Shakespeare in library crawlspaces!)
Another difference between this new genre and both sci-fi/fantasy and magical realism is the perceived "‘ordinariness"’ of the magic with respect to the fictional world in the novel. In sci-fi/fantasy and magical realism, the magic is largely perceived as normal and ordinary. As a plot device, the magic might be hidden from other characters or part of a fictional sub-culture, but the reader understands that magic is as natural to the world as air or water. In fantastical reality, the magic is an aberration. It's secret, often tinged with darkness and danger, and the characters who experience it are very much alone.
The magic is also not usually the true focus of the book. It's an additional factor, it'’s interesting to explore, it'’s perhaps a plot device; but the true meaning and message the author is crafting lies elsewhere. The Stolen Child is not a book about hobgoblins living in suburban woods. It's a book about core identity, what defines us as humans and individuals, and how we perceive the world around us. In this sense, fantastical reality is more akin to magical realism, where the magic often represents a key metaphor or central idea.
Ok, some specifics about The Stolen Child: This is Donohue'’s first novel and definitely had a slightly over-articulated "‘first novel"’ feel to it, as if Donohue got this brilliant idea and has been BURNING to turn it into a novel for some time. The plot is meticulously developed with no gaping holes or leaps of logic, although the pace does stutter quite a bit with long spans of inaction punctuated by moments of frenetic activity. I think this is typical problem of new writers who aren'’t yet confident in their story-telling abilities and have trouble stepping back from their attachment to individual scenes to see the book as a whole. Donohue does a brilliant job of crafting his characters and creating realistic dialogue. In particular, the poetic and lyric language of the hobgoblins comes off as completely believable--a very difficult feat in a modern book such as this. Here are two examples of this kind of language (in both examples, older hobgoblins are speaking to the new Aniday about the life of a hobgoblin): "“Are you thinking of our friends, late and lamented? They'’re better off where they are and not suffering this eternal waiting. Or is there something else on your mind, little treasure?"” (p. 237), and "“A raspberry is a raspberry. The blackbird is a metaphor for nothing. Words signify what you will"” (p. 252).
With a first novel as vibrant and fulfilling as this one, I'm very eager to see what Donohue does next.
If you liked this book or if the whole "‘fantastical reality"’ idea intrigues you, check out The Time Traveler'’s Wife by Audrey Niffenegger. I don'’t know if two books truly qualifies as an "emerging genre," but I'’ve got a feeling about this one, I tell you. I'll keep y'all posted if (nay, WHEN!) I come across more books of this type.
Monday, October 09, 2006
Cooking: Fall = Ginger Snaps
 My version of heaven would be endless autumn. And not just the beautiful crisp weather or the flaming trees against the bluest sky, but all of it. I love wearing my winter coat for the first time and finding a few left-over memories from the previous winter stowed away in the pockets. I love going to the Farmer's Market in Copley Square. I love seeing all the fruits and vegetables spilling out of their baskets and watching the people mill around fingering the last tomatoes and asking each other how the pears are this season. I love smiling at my favorite vendor, handing him a bag of apples--a different kind every week--and asking him about the harvest. I love drinking red wine out of a tea cup, making vast pots of soup and chili for my friends and family, and leaving ginger snaps out in bowls. I love the anticipation of the holidays to come. I love that I truly believe I can finish every single one of the crafty projects I have planned as gifts for the people I love. I love it all. Autumn is a season of change and I love the feeling of living on the cusp of something new. It makes me feel like everything is possible. Everything is moving and changing. It's the moment before the adventure begins and the hero sets out with his backpack slung over a shoulder.
On my runs through the park the past few weeks, I've been listening to The Power of Myth, conversations between Bill Moyers and Joseph Campbell recorded before Joseph Campbell died. There are many things in these conversations that speak to me as a writer and a person in her late twenties and as a person traveling through her life. But there is one phrase that I keep coming back to. Moyers and Campbell are talking about the beginning of the journey and the types of people who become heroes in the traditional myths. The most puzzling kind of hero is the one who comes upon his adventure unexpectedly, like Han Solo in Star Wars who gets unwillingly swept into the adventure. Campbell calls this the 'serendipitous adventure,' and Moyers asks if this kind of adventurer is still considered a hero. Campbell has this reply: "The achievement of the hero is one that he is ready for, and it's really a manifestation of his character. It's amusing the way in which the landscape and the conditions of the environment match the readiness of the hero. The adventure that he's ready for is the one that he gets."
 That's the line that keeps drifting through my mind as I walk through the Farmer's Market or look at the changing trees on my bus ride back from New York: "The adventure that he's ready for is the one that he gets." I feel on the verge of an adventure. I feel my life changing around me, threads of possibility and change rippling outwards. I've been playing with a lot of ideas about what I want for my future--both the near future and the far future, for my individual self and my career and my life with S., et cetera, et cetera. More specifically, I feel that my life has been moving in the direction of merging cooking and publishing and writing. This has been slowly developing over time, mostly without my knowledge, and it's a surprise to see them coming together now. I'm not sure exactly how these different things will unite, but I feel very sure that they will. For the moment, I'm happy to be on the edge of this change, feeling it grow, and not pushing things too quickly.
And in this spirit of movement and possibility, I give you my favorite cookie recipe: ginger snaps. Perfect for an afternoon snack with tea, evening dessert, or even a quick breakfast-on-the-go, the ginger snap is certainly the embodiment of possibility! My college roommate, R., was the first to introduced me to ginger snaps. A master storyteller herself, she had many eloquent things to say about the union of sweet sugar and spicy ginger, the balance of chew to crunch, and the harmony of the overall cookie. I still remember sitting in the window seat of our dorm room with her. I like to think it was autumn and maybe some afternoon sunlight was coming in through the window. She was eating a ginger snap, stolen from the dining hall, with her head tilted back and her eyes closed. She very precisely ate one bite of cookie, chewed thoughtfully, and handed it to me for the next bite.
Ginger Snaps
from The King Arthur Flour Baker's Companion: The All-Purpose Baking Cookbook
Makes six dozen 1 1/2-inch cookies
2 1/3 c. (9 3/4 oz) unbleached all-purpose flour
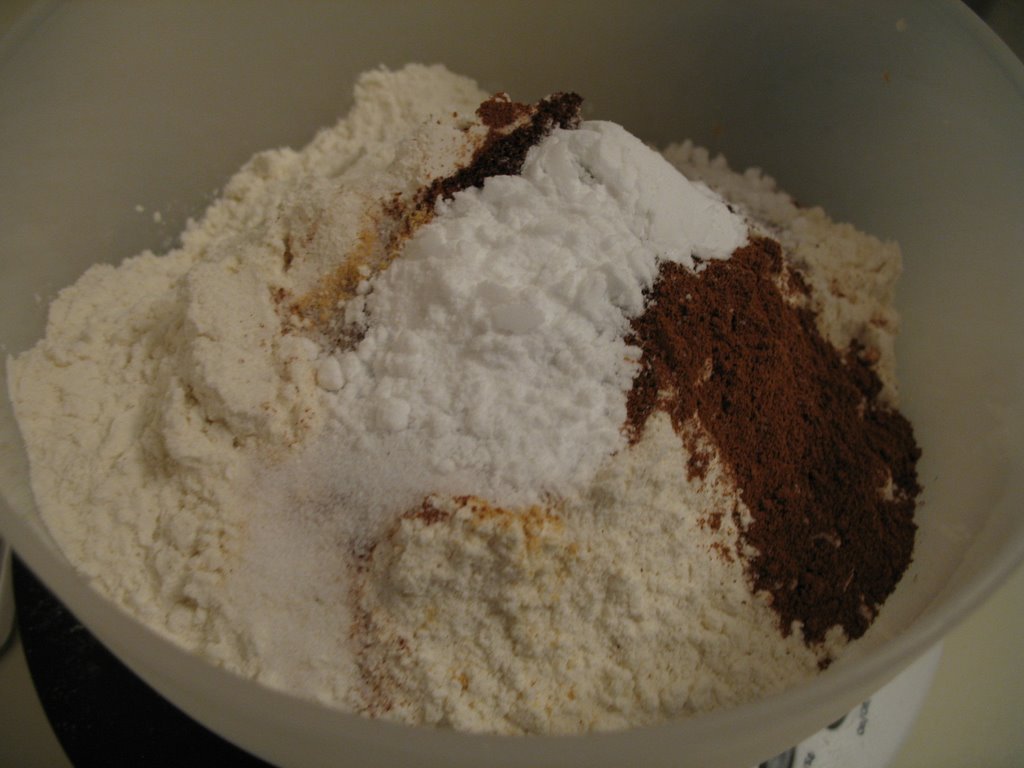
1 tsp ginger
1 tsp cinnamon
1/2 tsp cloves
1/2 tsp salt
2 tsp baking soda
3/4 c. (4 7/8 oz) shortening
1 c. (7 oz) sugar
1 large egg
1/3 c. (4 oz) molasses
 n a large mixing bowl, beat the shortening, sugar, and egg together until light and fluffy. Beat in the molasses. Stir in the dry ingredients to make a soft, smooth dough.
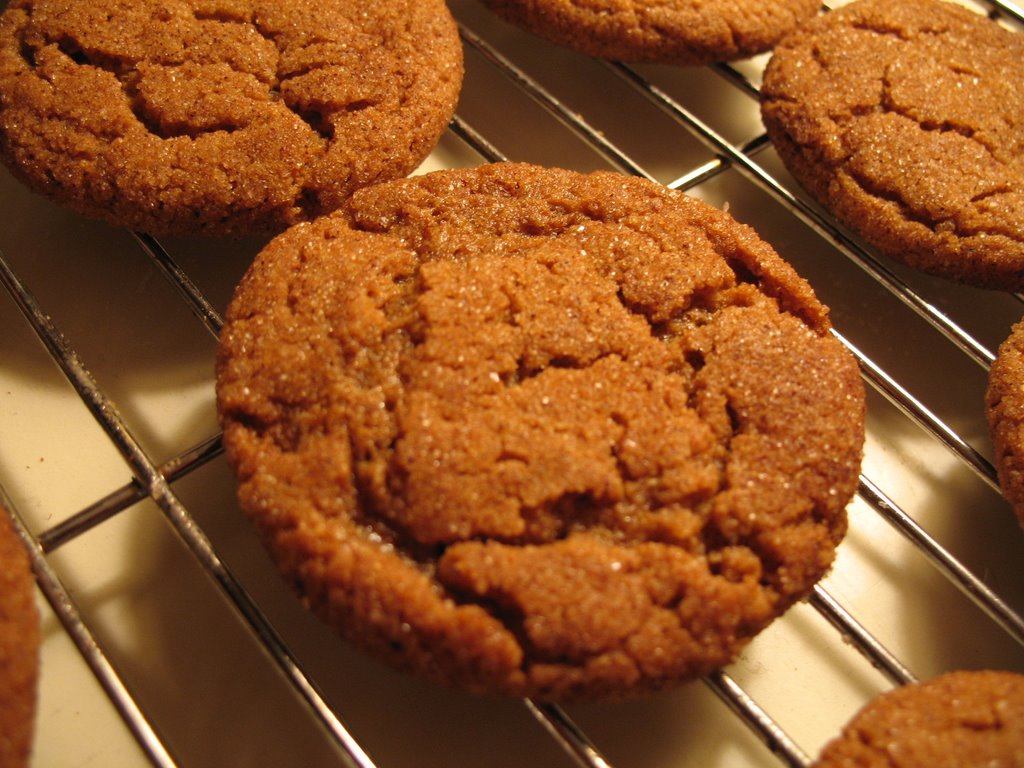
Sunday, October 08, 2006
Fall Garden Update
Oh, yeah! Remember my garden from months and months ago? The one I was so excited about and yet you haven't seen a single post on it all summer long? Well...I'll say this. It was definitely a learning experience.
First, the success stories: The basil ROCKED but I somehow mistakenly picked a small-leafed variety. It tastes great, but is kind of a pain to harvest a billion small little leaves. The lavender and rosemary finally picked up, and the mint is happy is a bee. I'm going to try keeping these herbs over the winter in hanging pots in my kitchen (lack of counterspace = need for hanging pots), so we'll see how it goes. Anyone out there have advice for keeping summer-loving plants in an apartment over the winter?!
The tomatoes were the biggest disappointment. They were supposed to be nice fist-sized tomatoes, but most of them never got bigger than a cherry tomato. Plus, the majority of them got blossom-end rot and had to be thrown away. I was able to salvage a few, though, and they were much fun to dissect and eat. Very tart and juicy. I used a few in sauces here and there and the tartness tended to overpower the sauce. I found them best on sandwiches (well, the one whole sandwich I was able to make with my handful of cherry-sized tomatoes) or eaten raw with salt. I've been told this just wasn't a good year for tomatoes and I should try again next year. I might need a little recovery time, but I think I'm game for another round in a few months.
The lettuce turned out pretty good, but unfortunately, I realized that I don't eat a lot of lettuce. So...it kinda went to waste. Ok, no lettuce next year. Makes more sense to buy it from the Farmer's Market the few times a summer I want fresh greens.
The flowers were great. The snap dragons still haven't quit popping up. The zinneas lasted a great while, but have now all pretty much withered away in the recent frosty weather. The sunflowers were a bit of a disappointment. Next year, I think I'll do zinneas, snap dragons, and dahlias.
But the real Cinderella story was the pepper plant. Remember how much trouble I was having with the blossoms falling off before the fruit started forming? I tried giving it some nice Epsom salts every week to even out it's...well, I don't know what it was evening out (calcium? water in-take?) but someone told me to try mixing some Epsom salt in the water every now and again. I think this did the trick, because after a while, the blossoms started withering into beautiful-looking peppers. The largest one got to be about half the size of my hand, but no bigger. That's cool with me, but I was more concerned about them ripening into a yellow peppers. But my most mature pepper stubbornly stayed green for weeks and weeks. I wrung my hands and chanted prayers, unsure if it was never going to ripen fully and maybe I should just pluck it now. But it didn't look like it was rotting. It actually looked like it was just...hanging out. You know. Chilling. Catching up on the latest gossip with the other veggies. Too cool for dirt and all that stuff. So I let it chill. And then, a few days ago, I go out to water my melancholy garden and what do I see, but this !
!
I'm so gosh darn proud! It's now sitting in our refrigerator with all the other grown up veggies looking a bit sheepish and uncomfortable. I think I'll probably cut it into strips and the Engineer and I can eat it raw with a bit of salt. I think my first-ever pepper merits some undivided attention and I don't want it to get lost in a sauce or on top of a pizza. Hopefully now that this guy has crossed the threshold, some of its brethren will do the same. THEN I'll make some sauce !
!
First, the success stories: The basil ROCKED but I somehow mistakenly picked a small-leafed variety. It tastes great, but is kind of a pain to harvest a billion small little leaves. The lavender and rosemary finally picked up, and the mint is happy is a bee. I'm going to try keeping these herbs over the winter in hanging pots in my kitchen (lack of counterspace = need for hanging pots), so we'll see how it goes. Anyone out there have advice for keeping summer-loving plants in an apartment over the winter?!
The tomatoes were the biggest disappointment. They were supposed to be nice fist-sized tomatoes, but most of them never got bigger than a cherry tomato. Plus, the majority of them got blossom-end rot and had to be thrown away. I was able to salvage a few, though, and they were much fun to dissect and eat. Very tart and juicy. I used a few in sauces here and there and the tartness tended to overpower the sauce. I found them best on sandwiches (well, the one whole sandwich I was able to make with my handful of cherry-sized tomatoes) or eaten raw with salt. I've been told this just wasn't a good year for tomatoes and I should try again next year. I might need a little recovery time, but I think I'm game for another round in a few months.
The lettuce turned out pretty good, but unfortunately, I realized that I don't eat a lot of lettuce. So...it kinda went to waste. Ok, no lettuce next year. Makes more sense to buy it from the Farmer's Market the few times a summer I want fresh greens.
The flowers were great. The snap dragons still haven't quit popping up. The zinneas lasted a great while, but have now all pretty much withered away in the recent frosty weather. The sunflowers were a bit of a disappointment. Next year, I think I'll do zinneas, snap dragons, and dahlias.
But the real Cinderella story was the pepper plant. Remember how much trouble I was having with the blossoms falling off before the fruit started forming? I tried giving it some nice Epsom salts every week to even out it's...well, I don't know what it was evening out (calcium? water in-take?) but someone told me to try mixing some Epsom salt in the water every now and again. I think this did the trick, because after a while, the blossoms started withering into beautiful-looking peppers. The largest one got to be about half the size of my hand, but no bigger. That's cool with me, but I was more concerned about them ripening into a yellow peppers. But my most mature pepper stubbornly stayed green for weeks and weeks. I wrung my hands and chanted prayers, unsure if it was never going to ripen fully and maybe I should just pluck it now. But it didn't look like it was rotting. It actually looked like it was just...hanging out. You know. Chilling. Catching up on the latest gossip with the other veggies. Too cool for dirt and all that stuff. So I let it chill. And then, a few days ago, I go out to water my melancholy garden and what do I see, but this
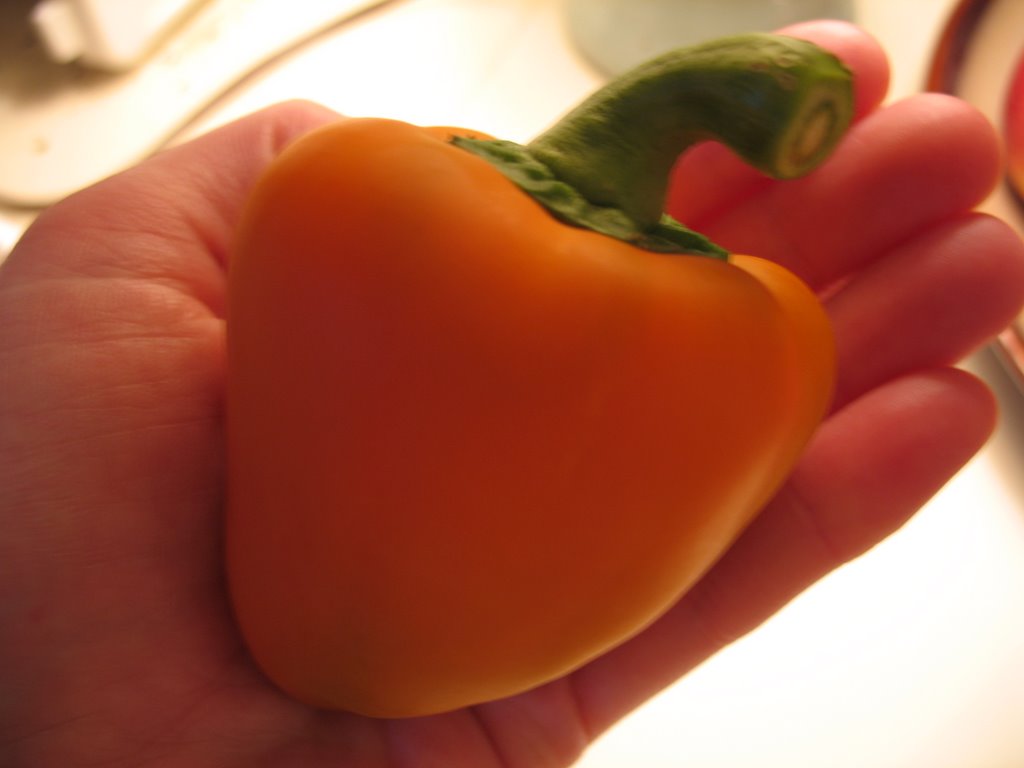 !
!I'm so gosh darn proud! It's now sitting in our refrigerator with all the other grown up veggies looking a bit sheepish and uncomfortable. I think I'll probably cut it into strips and the Engineer and I can eat it raw with a bit of salt. I think my first-ever pepper merits some undivided attention and I don't want it to get lost in a sauce or on top of a pizza. Hopefully now that this guy has crossed the threshold, some of its brethren will do the same. THEN I'll make some sauce
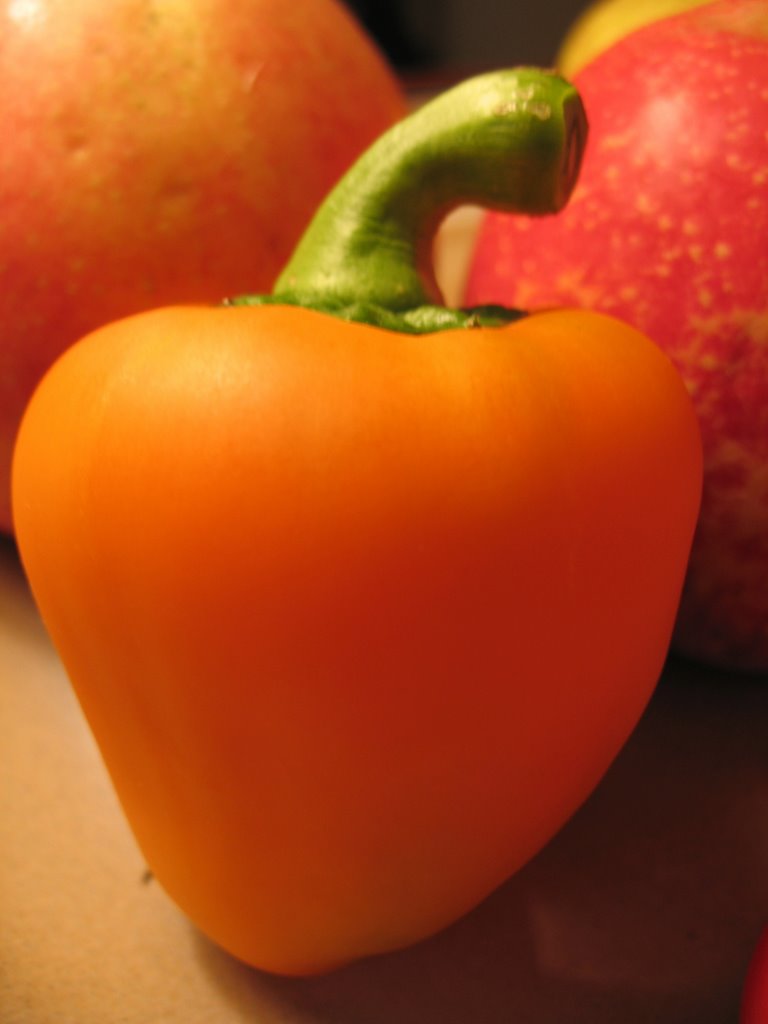 !
!
Wednesday, October 04, 2006
Crafts: Smoker Mittens by Request
A month or so ago while at the weekly knitting gathering we have at work, I was knitting away at the laptop cozy when one of my non-knitting co-workers strolled up to us and said, "Ok, so my hands get really cold during the winter when I'm smoking outside, so I'm going to go ahead and need one of you to knit me some gloves with those little flappy mitten things. Ok? Great. Thanks." I gave it some thought and said, "Sure!" I'm not a fan of smoking, but I AM a fan of someone buying me yarn to knit with, and this is what S. promised to do. Everybody wins.
So I found a few mitten and glove patterns, we had a Very Serious board meeting to go over the options, we haggled, we dealed, we combined features and came up with the Ultimate Smoker's Mitten Glove Thingy. This is essentially based on the Cigar pattern from Knitty.com (click HERE for the pattern), but to minimize the freezing of digits not being used in the act of smoking, the only exposed fingers are the index and middle fingers of the right hand. Both thumbs and all the fingers on the left hand will be covered. Then to even further increase the warmth, I'm going to cover both gloves with a mitten flap. In S.'s words, "This is a smoker's dream come true."
Off we go to Windsor Button to pick out some yarn. After much hemming and hawing on S's part and much calculating of gauges and converting of meters and feet on my part, we finally decided on Plymouth Indiecita Alpaca Knitting Worsted Weight wool, which is 100% Peruvian Alpaca. We were both immediately drawn to the softness and warmth potential of this yarn. S. picked out a lovely dusky blue color with a sandy beige for the stripes--the two principle colors of his wardrobe, apparently. The only real disadvantage to this yarn is that it is not superwash, so I reluctantly informed S. that he would have to handwash these gloves or they would felt into doll's gloves. He shrugged and said, "Then I just won't wash them." Problem solved.
Back at the office, we made traces of his hands and I set to work. I had to futz with the needle sizes a bit to get the right gauge, but ultimately settled on a Size 4 (the Cigar pattern calls for a Size 5). I absolutely love knitting with this yarn--it's like knitting with spun cloud. I also decided to knit these using a long circular needle and the "Magic Loop" method rather than double-pointed needles. For an explanation of the Magic Loop, go HERE. So far, I'm about halfway done with the first (right) hand. I decided to do a purled ridge along the back of the hand where I will ultimately attach the mitten flap--picking up stitches has never been my strong point, so I think the purled stitches will help meet me halfway. Here are some pics of the work-in-progress:
 Here's the cuff and beginning of the hand. I'm actually a bit further along than this now--I have the first two fingers done and made S. try them on. My fingers were a bit too long, so I had to (grudgingly) take out a few rows and re-do them. But that's a story for another post... P.S. glove fingers are a SNAP to do using the magic loop method. The method takes a bit of practicing and a leap of faith before you get the hang of it, but in my ever so humble opinion, it's well worth it. Not a single a curse word passed my lips whilst knitting the fingers, I do vouch unto you.
 Look at that GORGEOUS thumb gusset (this is where you increase the stitches to make room for the thumb. These stitches will eventually get taken off and stitched separately). You'd think I'd know how to do a decent increase by this point in my knitting career, but I seem to have to learn anew every time. I think I'm finally getting the hang of it though, thanks very much.
So I found a few mitten and glove patterns, we had a Very Serious board meeting to go over the options, we haggled, we dealed, we combined features and came up with the Ultimate Smoker's Mitten Glove Thingy. This is essentially based on the Cigar pattern from Knitty.com (click HERE for the pattern), but to minimize the freezing of digits not being used in the act of smoking, the only exposed fingers are the index and middle fingers of the right hand. Both thumbs and all the fingers on the left hand will be covered. Then to even further increase the warmth, I'm going to cover both gloves with a mitten flap. In S.'s words, "This is a smoker's dream come true."
Off we go to Windsor Button to pick out some yarn. After much hemming and hawing on S's part and much calculating of gauges and converting of meters and feet on my part, we finally decided on Plymouth Indiecita Alpaca Knitting Worsted Weight wool, which is 100% Peruvian Alpaca. We were both immediately drawn to the softness and warmth potential of this yarn. S. picked out a lovely dusky blue color with a sandy beige for the stripes--the two principle colors of his wardrobe, apparently. The only real disadvantage to this yarn is that it is not superwash, so I reluctantly informed S. that he would have to handwash these gloves or they would felt into doll's gloves. He shrugged and said, "Then I just won't wash them." Problem solved.
Back at the office, we made traces of his hands and I set to work. I had to futz with the needle sizes a bit to get the right gauge, but ultimately settled on a Size 4 (the Cigar pattern calls for a Size 5). I absolutely love knitting with this yarn--it's like knitting with spun cloud. I also decided to knit these using a long circular needle and the "Magic Loop" method rather than double-pointed needles. For an explanation of the Magic Loop, go HERE. So far, I'm about halfway done with the first (right) hand. I decided to do a purled ridge along the back of the hand where I will ultimately attach the mitten flap--picking up stitches has never been my strong point, so I think the purled stitches will help meet me halfway. Here are some pics of the work-in-progress:
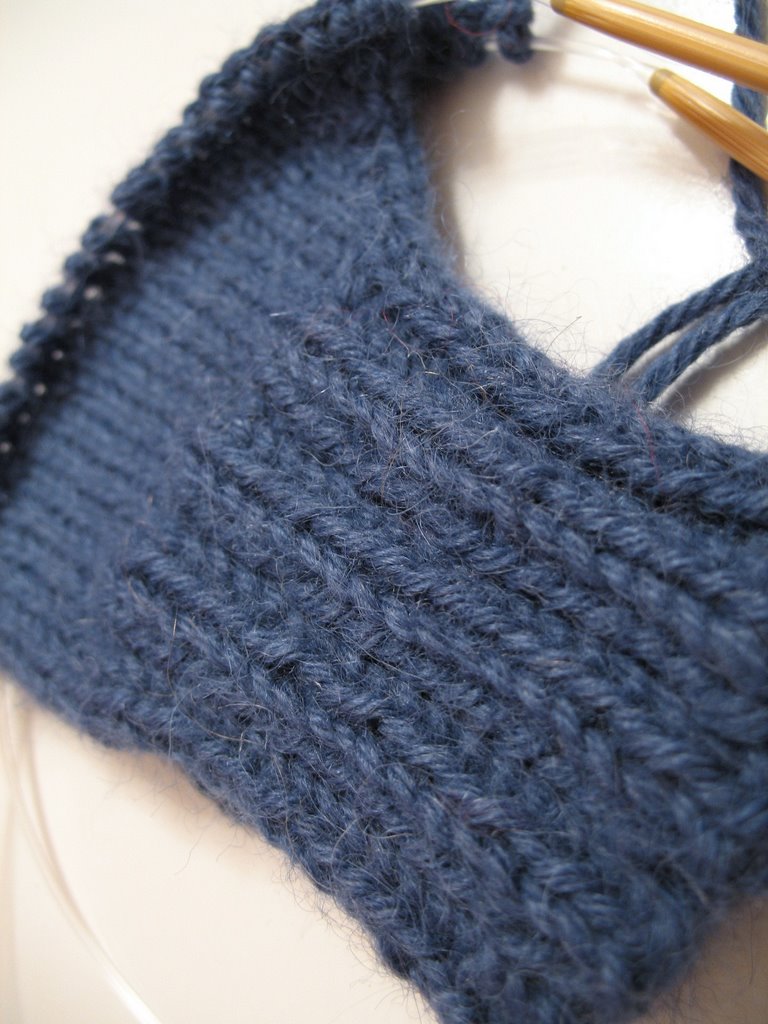 Here's the cuff and beginning of the hand. I'm actually a bit further along than this now--I have the first two fingers done and made S. try them on. My fingers were a bit too long, so I had to (grudgingly) take out a few rows and re-do them. But that's a story for another post... P.S. glove fingers are a SNAP to do using the magic loop method. The method takes a bit of practicing and a leap of faith before you get the hang of it, but in my ever so humble opinion, it's well worth it. Not a single a curse word passed my lips whilst knitting the fingers, I do vouch unto you.
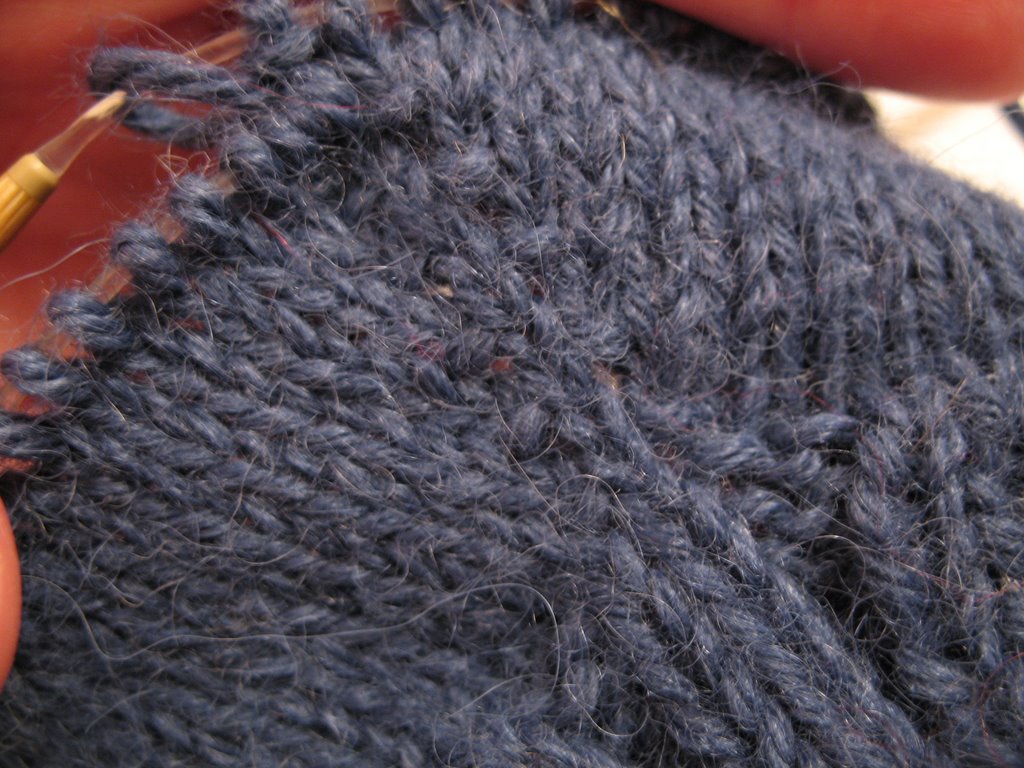 Look at that GORGEOUS thumb gusset (this is where you increase the stitches to make room for the thumb. These stitches will eventually get taken off and stitched separately). You'd think I'd know how to do a decent increase by this point in my knitting career, but I seem to have to learn anew every time. I think I'm finally getting the hang of it though, thanks very much.
I'm heading down to New York this weekend and am looking forward to several hours of knitting and catching up on podcasts on the bus down there. My (perhaps a bit lofty) goal is to have the gloves done by the time I'm back in Boston. Wheee!
Monday, October 02, 2006
Books: Bread Alone
Bread Alone: Bold Fresh Loaves from Your Own Hands
by Daniel Leader and Judith Blahnik
Bread Alone provides a good, solid introduction to artisan bread baking. Daniel Leader begins with a thorough description of the equipment, ingredients, and care that go into making a good loaf of artisan bread, imbuing the reader with a real sense of the romance and long tradition of bread baking in European history. The detailed recipes are interspersed with stories of bakers and bakeries that Leader has encountered on his European travels. The recipes for classic country-style hearth loaf, sourdough starter, and pain au levain are perfect for introducing new bakers to the fundamentals of artisan bread baking, and in fact, these are recipes that I go back to again and again as springboards for experimentation.
At times, however, Leader’s reverent and weighty language can be intimidating for the novice baker and makes ‘the perfect artisan loaf’ appear attainable by only the few learned and experienced master bakers. The repetition of the even most basic instructions in every recipe and the reminders to ‘conserve your plastic wrap!’ and ‘use only the best organic ingredients!’ can feel off-putting and condescending. An added frustration is the durability of the physical book--or lack there of. After only a few uses, pages of my favorite recipes started falling out of the spine. Ultimately, I had the spine cut off (we have a nifty machine at the noodle factory that does this in about five seconds! Fancy!), punched holes in the pages, and put it in a three-ring binder. Still, practicing the basic recipes found in this book is an excellent way to begin exploring the diverse world of artisan bread baking.
Books: The King Arthur Flour Baker's Companion
The King Arthur Flour Baker's Companion: The All-Purpose Baking Cookbook
This hefty cookbook is a veritable Mecca of recipes, baking advice, and resource information. Not only do the authors walk you through basics like white bread, chocolate chip cookies, and muffins, but they will then coach you onwards and upwards to such lofty aspirations as croissants, elephant ears, and sourdough artisan bread. If one of the ingredients is flour, I guarantee there’s a recipe for it in there. The tone throughout the book is friendly and familiar, never assuming prior baking knowledge but also including plenty for even the most experienced baker to get excited about. In addition to the recipes, boxes with helpful baking tips and background information on ingredients and recipes are scattered throughout the book. The appendix descriptions of the various equipment and ingredients one could possibly use for baking along with opinions on the merits of each item, how they can be used, and where to find them. This hard cover, 640-page book will withstand being propped up, pressed opened, dribbled upon by errant goos and powders, and still live to see another baking day. If you like to bake, this is one book that deserves a permanent place on the shelf.
This hefty cookbook is a veritable Mecca of recipes, baking advice, and resource information. Not only do the authors walk you through basics like white bread, chocolate chip cookies, and muffins, but they will then coach you onwards and upwards to such lofty aspirations as croissants, elephant ears, and sourdough artisan bread. If one of the ingredients is flour, I guarantee there’s a recipe for it in there. The tone throughout the book is friendly and familiar, never assuming prior baking knowledge but also including plenty for even the most experienced baker to get excited about. In addition to the recipes, boxes with helpful baking tips and background information on ingredients and recipes are scattered throughout the book. The appendix descriptions of the various equipment and ingredients one could possibly use for baking along with opinions on the merits of each item, how they can be used, and where to find them. This hard cover, 640-page book will withstand being propped up, pressed opened, dribbled upon by errant goos and powders, and still live to see another baking day. If you like to bake, this is one book that deserves a permanent place on the shelf.